Showing posts with label i-phone. Show all posts

Tuesday, April 1, 2014

Understand Why iPhone Charges Fast First and Then Slows Down

If you own an iPhone, iPad or iPod, you may have noticed something a little odd about the way it charges: fast up to a certain percentage and then slower and slower as it gets closer to 100%. I noticed this a few weeks back and since I know practically nothing about current, electricity, volts, amps, chargers, etc, I wasn’t sure if this was the way my iPhone was supposed to charge or not.
Eventually, I tested it out on the iPad too and realized that it did the same thing. It would charge to around 70-80% pretty fast and then would slow down significantly before getting to 100%. Actually, from my calculations, the time it took to go from 1% to 80% was about the same time it took to go from 80% to 100%!
In this article, I’ll explain the little I learned and understood about charging Apple products and hopefully will give you a bit of an understanding of what exactly is going. If you are an engineer or someone who knows a lot about this topic, feel free to post your thoughts in the comments!
iphone charge

Power Sources vs Chargers

The first thing to understand is the difference between a power source and a charger. You probably have said the statement below at least once in your life in you own any Apple device: “Where’s my charger?” 
Unfortunately, this statement is technically inaccurate. The cable and adapter that you plug into the wall is actually just a power source. It draws current from your wall and delivers a set amount of amps and watts to your iPhone, iPad or iPod. The charger is actually in the device itself. That is why you can use an iPhone charger to charge an iPad or an iPad charger to charge an iPhone.
The charger inside the iPhone or iPad controls the flow of current into the device, not the adapter. If you ever have checked, the iPhone adapter is rated at 5 watts and 1 amp. The iPad adapter is rated at 10 watts and 2.1 amps.

The iPhone and iPad Charger

The battery inside your iPad or iPhone is a rechargeable lithium-ion polymer battery. It’s what Apple uses for all their devices, including Mac computers. Apple has a great page that explains a bit about their battery technology, but the best part is this chart they provide:
apple batteries
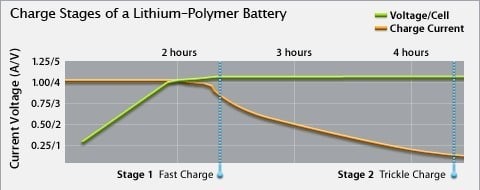
Let’s take a look at this chart. On the Y axis we have Current Voltage (A/V). A is for amps and V is for volts. The first number is amps and the second one is volts. On the X axis we have the stages of charging: fast charge and trickle charge. Stage 2 is what explains why your Apple device slows down and takes more time to charge when you get past 80%.
As you can see, the number of amps remains at 1 (for the iPhone, 2.1 for the iPad) for the first two hours and then drops off over the next two hours all the way down to zero when the device is fully charged. You have probably also noticed that sometimes when you disconnect your iPhone or iPad from the charger, it could be anywhere from 96% to 100%. This is because of the trickle charging. When it reaches 100%, it shuts off. If the battery starts to drop, it will kick back in around 96% and start charging again slowly.

Why Do We Need Trickle Charging?

So this bears the question: why the heck do we need trickle charging? Why not just fast charge all the way to 100% and be done with it? Well, apparently it has to do with the chemistry behind lithium ion batteries, which I have no idea about. In a nutshell, lithium ion batteries react very badly to being over-charged and therefore you never want that to happen.
Trickle charging solves this problem by reducing the current at the latter part of the charging and completely stopping it once the battery is fully charged. That is why it is also not harmful to leave your device connected to a power source even after it has fully charged.
In conclusion, the charger is inside your device and the thing you plug into the wall is the power adapter, not the charger! All this technology is there to basically preserve your battery life over many charge cycles. If you have any questions, let us know in the comments! Enjoy!

Friday, March 21, 2014

How to Pass All iPhone Traffic through an Encrypted VPN

Today, we use our smartphones for everything from reading news to checking bank accounts to ordering food to texting family and friends. You always read about being careful when using a laptop on a public WiFi network because of hackers and snooping, but what about your smartphone? A hacker could probably gain more information about you from your smartphone if they could capture the data being sent between your apps and the Internet.
It’s probably true that the banking app you use on your iPhone probably encrypts the data sent between the phone and their servers automatically, but there is no guarantee. Plus, a lot of apps simply aren’t created with security in mind and therefore send data over the Internet in plain text. If you travel a lot and are routinely connected to unsecured WiFi networks, you should consider tunneling all that traffic through a VPN.
If you have a corporate iPhone, that’s probably already taken care of for you, but what if you want to secure your personal device? If you have the time and patience, which you’ll definitely need, you can setup your own personal VPN server and connect to your VPN from anywhere in the world whenever you want to secure all the traffic coming in and out of your iPhone.
In this article, I’ll walk you through the steps that would  be needed to accomplish something like this. There are many ways to go about it and the best way depends on what kind of hardware you already own. For example, I own a Synology NAS that allows me to create a VPN server and to access the NAS from the Internet using dynamic DNS.
In order to do this, you’ll need to be a little bit of a geek. Unfortunately, it’s too hard for someone who doesn’t have a clue about technology. However, even without any previous tech knowledge, if you are willing to spend some time reading and understanding, it’s not impossible to accomplish.

Step 1 – Understanding IP Addresses and DNS

Before we delve into any details about how configure VPN settings on your iPhone, let’s talk about IP addresses and DNS. These two topics are essential to understand before you go about creating a VPN server. To get started, read my post on the difference between a static and dynamic IP address.
Basically, if you’re going to be running a VPN server from your home, you’ll need to setup dynamic DNS so that you can access your server from anywhere using a DNS name like myhomeserver.no-ip.com. No-IP is a service that provides free dynamic DNS.
dynamic-dns-server
Before you go creating an account, read my post on how to setup free dynamic DNS. The way it works is that you have to install a piece of software on your computer that keeps updating the service with the latest IP address assigned by your ISP.
Note that you don’t have to do this right now. You could go ahead and setup your VPN server first and then setup dynamic DNS. There is no real order you have to follow. You just need to make sure each part is working on it’s own.

Step 2 – Port Forwarding

The next part that needs to work independently is port forwarding. Dynamic DNS basically allows you to say “Hey send all the traffic for this VPN to myhomeserver.no-ip.com” and it will automatically figure out what the current IP address given by your ISP is for your home and send it there.
However, it won’t matter if that traffic is coming if your router blocks all of it, which all routers would do by default. Data send over VPN will use certain “ports” that need to be opened on your router in order for the data to be sent to the computer inside your network. This is called port forwarding.
Next, read my article that explains port forwarding and how it is used. You’ll have to open a couple of ports on your router for VPN. When you read the articles on setting up a VPN below, you’ll be told the actual port numbers.
port-foward
I also wrote an article about configuring a router for port forwarding. The process is different depending on the router you have, but you can easily find instructions online by searching for your router brand + “port forwarding”, i.e netgear port forwarding, d-link port forwarding, etc.

Step 3 – Setup a VPN Server

There is no single way to setup a VPN server, unfortunately. If you happen to have a Synology NAS like I do, you can follow these instructions for setting up the VPN server:
http://www.synology.com/en-uk/support/tutorials/459
vpn server
Simply click on L2TP/IPSec in the left-hand side and then click the Enable checkbox. Leave all the settings on default and simply type in a pre-shared key. Then click on Privilege and make sure that the user you want to have access to the VPN is granted the appropriate permission.
vpn privilege
On the router, you’ll need to forward UDP ports 1701, 500 and 4500 if using L2TP. It takes about 5 minutes to setup and other than the ports, you need to configure DDNS, which is also built into Synology NAS products.
If you don’t have a NAS, you can configure VPN settings in your router if it has dd-wrt installed. dd-wrt is a open source Linux-based firmware for routers. You can actually replace your current router’s firmware with dd-wrt if it’s supported. It’s a bit more complicated to setup on dd-wrt, but they have lots of documentation on their site.
If neither of these options works for, then your best bet is to turn Windows 7 or Windows 8 into a VPN server. There is an excellent guide by the How To Geek site on creating a VPN in Windows 7. You can follow the same instructions for Windows 8. When setting up a VPN using Windows, it’ll probably be PPTP, which means it’ll use a different set of ports than L2TP. The article mentions the port numbers also.

Step 4 – Connecting to a VPN via iPhone

The last step in this whole process is actually connecting your iPhone to your personal VPN. Luckily, you don’t have to download any apps or anything else since it’s built into iOS. First go to Settings and then tap on General. Scroll down to the bottom where you’ll see VPN.
vpn settings 1
Now tap on the Add VPN Configuration button.
vpn settings 2
On this screen, you’ll need to enter all the pertinent information. This includes the server name, which should be the dynamic DNS URL you get when you sign up for a dynamic DNS service. You’ll also need the user name and password for the Synology account or Windows account that has permission to connect to the VPN. Lastly, the pre-shared key is that extra password you had to type in when creating the VPN server. Of course, you want to have Send All Traffic enabled so that everything gets encrypted.
vpn settings 3
Now to connect to the VPN, go back to the main Settings screen and you’ll see a new VPN option below Cellular and Personal Hotspot. Go ahead and tap on that to connect and it will change to VPN Connecting.
vpn connecting
If all goes well, you’ll see it turn green!
vpn connected
Lastly, when you exit and go to any other screen, you’ll see the little VPN icon now at the top of the status bar.
vpn iphone connected
Sweet! Now you can rest assured that no one can spy on your Facebook stalking sessions or other nefarious activities! Like I mentioned before, this is not the easiest thing to get working and it will take some time, lots of reading, lots of tweaking and testing before you get it right. However, once it’s setup, it’s pretty cool. Whenever I’m not at home and use my iPhone for anything other than browsing the web, I always connect to my VPN first.
Please feel free to post a comment here with your problems, questions and issues. I’ll be more than glad to help. Also, if you have a different setup for your iPhone using different tools and services, feel free to let us

Friday, March 14, 2014

How To Personalize Your iPhone From The Inside Out

I’ve been an iPhone user since I was able to get my hands on one, which wasn’t easy as a Canadian. I had to go to eBay and grab an iPhone second-hand. Then I had to jailbreak it. In essence, I made my first ever iPhone as personalized as possible … because I had no other choice!

Now that iPhones are widely available, I have plenty of choices. And those choices aren’t just related to apps or carriers. There are many ways you can personalize your iPhone from the inside outand that’s how you can make the device a real pleasure for you to use every single day.

The Right Case

One thing you can do that requires virtually no knowledge of the iPhone’s innards is to get a case that says “you” and wrap it in that. To be honest, I’ve got one case that does that for me, and it doesn’t really seem like a case at all, which is actually one of the reasons I like it so much.
It’s made by WoodChuck, a company that makes far more than iPhone cases (and they do custom work). I have a Green Lantern case (pictured) for both my iPad and iPhone, and being able to look at the GL logo every day really resonates with me, and the case is top quality.
WoodChuck represents American-made products in an industry over-populated by overseas manufacturing. Their products are 100% sustainable and customizable, so beyond being incredibly personal, they’ve got a great company culture to match: these things are important to me. See if you can find a case that resonates that well with you.

Device-Specific Uses

I’ve got a myriad of devices, and I want to make sure I use each of them with intent. One of the ways that I’ve chosen to make my iPhone as personalized as possible is by using it for certain things and not using it for others.
For example, I don’t read on my iPhone. I don’t have any RSS reader applications installed on it, and I don’t have iBooks installed on it. That’s what my iPad is for. By removing the reading applications from my iPhone, I’ve freed up one particular area that I know it is not intended for. And that can really help me in terms of being more efficient and effective in my use of the ones that it is for.
So, take a look at what you have installed on your iPhone and decide if it’s really what needs to be on there. You may find there are some applications that you’re just not using because the device just isn’t designed for that purposeat least not in the way that you use it.

Launching Apps

Having a bunch of apps installed all over the place is one thing, but having an app that allows you to quickly access the apps you use most often (and keep your screens as clutter-free as possible in the process) is another. That’s when apps like Drafts and Launch Center Pro come into play.
I use Drafts as my ultimate inbox. Everything that I input into my iPhone goes through Drafts, be it tasks, tweets, or ideas for posts like this one. Then from within Drafts I can decide where those things should actually be. Tasks go to OmniFocus or Asana, tweets go to Tweetbot, and ideas for posts either go straight to Byword or sit in Evernote. But I always know where the starting point is: Drafts.
I’ve also personalized all of the destinations within that app. I use Launch Center Pro in many cases when I know where things are going to go immediately. I use a setup very similar to Michael Schechter’sa setup that works very well for me. Using Launch Center Pro allows me to make choices with my iPhone that are designed and maintained by me. And using these apps also allow me to keep my screens and folders in far better shape, which is the shape I like to keep things in.

Screens and Folders

Any of you who have read about the iPhone since it came out have probably seen articles that show off users’ home screens. With the arrival of iOS 7, you can now put more apps in folders, finally bury Newsstand inside of a folder, and really decide how you want to map out your iPhone so that it works more cohesively for you. I’ve gone as far as to keep the bottom row on my home screen “app free” because of the amount of real estate I’ve got to work with now.
When it comes to screens and folders, the possibilities are endless. And that means personalization is just as endless. We can’t do much about changes to operating systems or updates to our favourite apps. But now, more than ever, we are able to make our iPhones uniquely ours. And we can do that from the inside out.

26 iPhone 5s Tips You Should Not Miss

The smartest smartphone has come a long way. Apple has molded their product into a gadget with cutting edge design and features. Look at these hot ones:
  • A one-of-a-kind chip that has a 64-bit architecture.
  • A camera that works better and faster.
  • Equipped with an identity sensor that can decipher your fingerprints.
  • Comes with an operating system that’s built and designed solely for 64 bit.
To say all of those features make the iPhone 5 a smartphone that’s ahead of its time is an understatement. There’s absolutely no doubt, it leads the smartphone game. Not only that, it’s more savvy than it appears, and so much more. This is your day. I’m unleashing tips and tricks to raise up your iphone 5 experience to the next level.

Time for tips ahoy…

(View photos from left to right then see corresponding description of tips below each set of photos.)

PHOTOGRAPHY

iPhine 5_photography_hero
Share multiple photos
Tip #1 Tap multiple images to share them all at once with iCloud Photo Sharing.
Panorama
Tip #2 You can easily shoot panorama photos from left to right or right to left. Just tap the arrow to switch the direction.
Burst Mode
Tip #3 Capture multiple shots of the action — for as long as you hold down the button — by snapping 10 photos per second. And real-time analysis suggests the best photos of the bunch.

FACETIME

FacetimeMessages
Tip #4 View timestamps of your messages by touching and dragging message bubbles to the left.
Weather
Tip #5 View all your locations by pinching to see a collapsed view. To reorder locations, simply drag them where you want. Swipe from right to left on a location to delete it.
facetime_hero_Anthony
FaceTime audio
Tip #6 Now you can make audio-only FaceTime calls. On your contact’s card, tap the phone icon in the FaceTime section.

SWIPE GESTURES

iPhone 5_gestures_heroDelete a message in Mail
Tip #7 Simply swipe from right to left on messages in your inbox to quickly delete them.
Go back in Mail
Tip #8 To go back, swipe left to right from the edge of your screen.
Spotlight search
Tip #9 To open Spotlight search, swipe down from anywhere on the Home screen — such as the middle. Then type in what you’re looking for to quickly find it on your device.

SIRI

siri_hero
Tell Siri who’s who
Tip #10 Tell Siri about your relationships, such as “Erin is my wife” or “Rick is my dad.” Then you can say “Text my wife” or “Call Dad” and Siri knows who you mean.
Set your locations
Tip #11 Enter your home and work addresses in Contacts. That way, Siri can remind you to do things when you leave or arrive at either place.
Change the way Siri pronounces a name
Tip #12 If Siri mispronounces a name, simply say “that’s not how you pronounce that.” Siri will ask you for the correct pronunciation, then say the name back to you three different ways so you can choose the one you like.

CALENDAR

calendar_heroNew views in Calendar
Tip # 13 View your calendar by list, day, or month. Switch to landscape view to see a full five days.
Swipe gestures
Tip #14 Tap the month name in the left corner to change to month or year views. In Day view, you can swipe the week bar at the top to jump to days in the next or previous week.
Search for specific events
Tip #15 Tap the search icon for a list view of every event in your calendar.

MUSIC

music_hero
Create playlists
Tip #16 In the Music app, tap Playlists, then tap Add Playlist and give it a name. Now tap any song or video to add it to the playlist. You can add individual songs, entire albums, or all songs by an artist.
Create radio stations
Tip #17 To create a station in iTunes Radio, tap the + icon under My Stations and search for an artist, genre, or song. Or choose from over 250 genre-focused or DJ-curated stations.
Edit radio stations
Tip #18 Remove or add new stations to your My Stations list by clicking Edit and the minus symbol to delete stations or the plus symbol to add them.
Buy songs from iTunes Radio
Tip #19 Tap Buy on a song that’s currently playing or one in your History or Wish List, and it downloads instantly from iTunes to your library.
music_hero2Musical landscape

Tip # 20 While browsing your music collection, switching to landscape view displays a mosaic of your album covers. Swipe to scroll, pinch to zoom in and out, and tap to play.

MAIL

mail_hero
Insert a photo or video

Tip #21 When you’re composing an email, touch and hold in the message to see the “Select, Select All” menu. Tap the arrow and select “Insert Photo or Video.” Now you can choose a photo or video to attach from your Camera Roll, albums, or shared streams.
Keep your inbox clean
Tip #22 You can delete or move messages in batches. From your inbox, tap Edit, select the messages you want to organize, then tap Trash or Move.
Get back to your draft
Tip #23 Touch and hold the Compose button to switch to your list of saved message drafts.

SAFARI

safari_hero
Single sign in

Tip #24 Sign in once under Settings, and you can tweet or update your Facebook status directly from Safari, Photos, Camera, and Maps. Or ask Siri to do it for you.
Manage open Safari pages
Tip #25 Drag and drop to rearrange your tabs. To close tabs, tap the X or just swipe them off the screen.
Create web clips
Tip #26 Quickly visit your favorite websites by creating web clips for them on your Home screen. Visit the site and tap the Share button. Then select “Add to Home Screen.”
You want more tips? Navigate to Apple.com. Apple supplied all the tips featured in this post.

Tuesday, March 11, 2014

iPhone 6: All The Hardware Rumors So Far

Apple's next iPhone is always a heavily rumored affair. We gather all the whispers here and make sense of it.

With Mobile World Congress just around the corner, rumors about new and upcoming devices are as thick as San Francisco fog. However, one company that won't be in Barcelona next week is Apple. The Cupertino-based company prefers to steer clear of these big conferences and mass launch events, choosing instead to host their own exclusive events. That way, its news never gets lost in the flood of announcements (as if that could happen to the Apple of today).
What you may wonder, after hearing about all the new phones that are going to arrive through the spring and into the summer, is if the iPhone 6 is will match up to the MWC debutantes. Apple hasn't announced the device yet, and it's not expected to announce anything for a while. After all, the iPhone 5C and iPhone 5S were just announced and released in September. Though Apple has traditionally announced new phones at WWDC in June, it's thought the switch to September refresh will carry through to this year. So what can we expect come fall?

iPhone Screen

Arguably one of the most important features of a smartphone, given it's what you'll spend all your time looking at. Apple pays special attention to its displays, adding its famed Retina Display with the introduction of the iPhone 4. Talk of the iPhone 6 display Recent rumors suggest Apple is going to use a sapphire display in the iPhone 6. The company’s new Arizona plant will produce sapphire glass, that much we know. Tim Cook confirmed it while speaking to ABC. Now, Apple already uses tiny amounts of sapphire glass for the home button and to keep the camera safe from scratches, and though it’s technically possible that this is all the company needs the new plant for, that seems highly unlikely. Word on the street says Apple will kick things up  a notch and make the entire display out of this tough material. This week, Canonical’s CEO complained that Apple had bought up a three year supply of a display Canonical wanted for the Ubuntu Edge. Apple’s either has a huge need for sapphire glass or is stockpiling for a future product while keeping the product away from its competitors.
The iPhone 5S the biggest iPhone to date with a screen that measures four inches in size. Despite this fact, it’s still quite small compared to other current generation smartphones. Though Samsung’s Galaxy Note was considered huge not too long ago, a 5-inch phone is a fairly common sight, and Apple could go after the phablet lovers with the iPhone 6. There’s talk that Apple might ship multiple different sizes of iPhone with the iPhone 6, including a 5.5-inch version. While we think Apple is unlikely to ship so many iPhones (it wasn’t until last year that the company introduced a second iPhone to stand alongside the flagship model), it’s not outside the realm of possibility that we’ll see a larger iPhone. Steve Jobs was the one who pooh-poohed larger screen sizes and Steve isn’t around anymore. Remember when Steve said we’d need to file our fingers down for a 7-inch tablet? Yeah, us too.

iPhone CPU and SoC Chipset

The iPhone 5S was noteworthy for its 64-bit A7 chip manufactured on the 28 nm process. Given the iPhone 5S has only been on the market for six months, this chip is still a really fresh piece of technology. However, with Samsung rumored to have a 64-bit chip of its own on the way, Apple may want to up its game. No surprise then that the latest scuttlebutt points to an Apple A8 chip manufacture red on the 20 nm process powering the iPhone 6. Further talk of a 64-bit A8 points to Apple using Taiwan Semiconductor Manufacturing (TSMC) to manufacturer the A8. This would be a move away from rival smartphone maker Samsung, which Apple has used for production of its chips in the past. TSMC hasn’t confirmed the news, and neither has Apple (of course).

iPhone Form Factor

So, the iPhone might have a bigger display, but that’s not to say it will be bigger over all. The rumor mill is churning out whisperings of an edge-to-edge of minimal bezel display, which could theoretically increase the size of the display without making the phone bigger. The real question is whether Apple is willing to ditch the physical home key or make it smaller. We’d say no, considering it just added fingerprint recognition with the iPhone 5S, but the home key could be reduced in size or moved to a different location on the iPhone 6. Again, that's unlikely but if Apple wants a bigger display without significantly increasing the size of the phone, this would be one way to do it. One analyst even claims to have gotten wind of such a prototype.
As far as casing is concerned, it's hard to predict what Apple will do. The iPhone 2G was metal, then the 3G brought plastic casing that continued through to the 3GS. The iPhone 4 gave us the glass backing, which was also present in the 4S. The iPhone 5 saw Apple bring back the metal with an aluminum casing, and the iPhone 5S has the same chassis. Discounting the iPhone 5C (Apple brought back the plastic we saw with the 3G but in a range of colors), Cupertino seems to introduce a new case with each full upgrade of iPhone. Word on the street is that the iPhone 6 will also feature a metal chassis, but that it will be lighter and thinner than the current iPhone 5S.

Wednesday, March 5, 2014

Trending iPhone Apps for Today

Looking for iPhone apps that are trending in iOS land? Our team does the hard work for you. We compile Today’s Hottest iPhone Apps from around the world and list them here just for you. Updated daily with all the iPhone apps and games that are creating the most buzz in the App Store.

PolymerPolymer

Price: $0.99
App Store Rating: 4.5/5
Polymer is a strategic shape-creating game that combines the logic of Rubik’s Cube, the sliding mechanism of Chuzzle, and the creativity of Lego and is on sale for $0.99 right now.

Logos Quiz GameLogos Quiz Game

Price: Free
By: AticoD
App Store Rating: 4.5/5
Know your logos? Logos Quiz Game shows you hundreds of logos from different companies and asks you to pick the company name.

SpotifySpotify

Price: Free
App Store Rating: 3/5
Spotify has been released for the iPad. Read our full review of the Spotify iPad app.

WoW Camera ProWoW Camera Pro

Price: Free
App Store Rating: 4.5/5
Take pictures, edit and manage them inside this free utility app that supports folders and password protection, photo editing and more.

SpellswordSpellsword

Price: $0.99
App Store Rating: 4.5/5
Spellsword has become the top RPG application in a few different countries, great for fans of Hack N Slash iPhone games.

NightfallNightfall

Price: $4.99
App Store Rating: 4.5/5
Nightfall brings AEG’s deck-building game to iPhone and iPad where you are fighting ghouls, vampires and werewolves, with multiplayer support.

InstacastInstacast

Price: $0.99
By: Vemedio
App Store Rating: 4.5/5
Great podcast app for subscribing to, downloading and listening to podcasts quickly and easily, with iCloud support for syncing across devices.

100 Floors100 Floors

Price: Free
App Store Rating: 3.5/5
Try and get to the 100th floor of this building in a free and challenging puzzle solving iPhone game.

Space Fart HDSpace Fart HD

Price: Free
App Store Rating: 4/5
Toot much? SpaceFart takes flatulence to space in this entertaining funky little iOS shooter that is free to try.

Star Wars Pit DroidsStar Wars Pit Droids

Price: Free
App Store Rating: 4.5/5
Star Wars Day was May 4th and as a promo the Pit Droids game has gone free. Addictive Puzzler with a theme.

SloProSloPro

Price: Free
App Store Rating: 4/5
Records slow motion video from your iPhone, at 60 FPS and is free. Everything looks more interesting in slow motion!

Wednesday, February 19, 2014

10 Secret iPhone Powers

With few exceptions, your iPhone can do everything your desktop PC can do. Here are 10 easy ways to unlock your iPhone's full potential.

10 Things You Didn
Apple iPhoneYour iPhone came loaded with great software that lets you get driving directions, listen to music, watch YouTube, surf the Web, keep your appointments, and of course make phone calls. But the iPhone can do far more than that—it truly is a full-fledged computer that fits in your pocket. With few exceptions, your iPhone can do everything your desktop can do, often at no cost. Here are ten things you might not have thought of, all of which you can do without spending a dime.
Apple iPhone Tips 1-5
1. Send free SMS messages, or "fake" MMS messages.
If you find yourself running over your text message limit on your cellular plan, don't despair! As long as you know your friends' cell-phone company, you can send them text messages free using e-mail via their carriers' e-mail-to-SMS gateway. In most cases, you send an e-mail to your contact's phone number @[their carrier's URL]. We've compiled a list of the proper format for each carrier's SMS gateway. For example, to send a text to the AT&T phone number (555-595-5244), you'd e-mail 5555955244@txt.att.net. It takes a bit longer than traditional texting, but it will get there, and you won't have to pay the standard text-message rate. Using these gateways lets you get around one of the biggest limitations of the iPhone—the lack of multimedia messaging. Since you're sending e-mails, you can attach a photo, and your image will be delivered as an MMS message. Just add the e-mail-to-SMS address to your contacts as a second e-mail address so that you can access it easily, and you can stop worrying about whether iPhone 3.0 will support MMS or not.
2. Sync your iPhone's calendar with Google Calendar.
Sync your iPhone
This new sync capability was announced by Google just before we were set to publish this tip roundup. Yes, you can now sync your Google Calendar with your iPhone without resorting to any third-party services, but it won't happen automatically. First, you need to make sure your iPhone firmware is Version 2.2 or later. Then you visit http://www.google.com/mobile/apple/sync.html, and take a few proactive steps. Don't ignore the step of backing up your contacts, as the Google Sync setup will delete them from the device. There are a couple of disadvantages to backing up your contacts to Google Contacts—doing so means you're no longer syncing with Outlook or MobileMe contacts, if you'd set one of those up. And you're sharing all your contacts with Google, which may or may not be a problem, depending on your comfort level. Finally, don't be confused by the fact that you actually set up your Gmail account as a Microsoft Exchange account rather than the Google Mail choice—Google Sync uses an Exchange server to accomplish the syncing. In the next 13 steps of the process, you'll enter Google's server name and choose whether you want Contacts, Calendars, or both synced; and finally pass a couple of scary red warning screens reminding you that you'll lose the existing contacts and calendar entries on the phone. Thereafter, your contacts and calendar entries will sync with the beta Google services rather than MobileMe or Exchange. If you've enabled Push in your iPhone's Fetch New Data control panel, you won't have to do anything for the info to update. Otherwise, you can sync every 15 or 30 minutes, or manually when in your Gmail inbox.
3. Make your own ringtones.
Make your own ringtones.
Find that paying double to convert your song to a ringtone cramps your style? With this trick, you can make free ringtones from virtually any audio file. Just convert it to the AAC format (if it isn't already there): Set iTunes to import using its AAC filter, then right-click your file and select Create AAC version. Next, edit the file in any music editor (such as GarageBand on a Mac, or Audacity on Windows or a Mac) to select the 20 to 30 seconds that you want for your ringtone. Rename the file extension from .m4a to .m4r, then double-click it and iTunes will import it as a ringtone and sync it to your iPhone. The only catch: It doesn't work with DRM-protected songs. But now that iTunes offers DRM-free music, just buy the unprotected version and you're good to go. 4. Keep a photoblog.
The iPhone has everything you need to keep a visual diary online. Many blogging platforms, such as Blogger, allow you to e-mail photos directly to the site. In fact, you can create a "moblog" on the fly by e-mailing go@blogger.com from your phone (they'll e-mail you back with log-in details so you can edit your blog later on, when you're at a computer). Posterous is another service that will let you set up a blog directly from your phone—e-mail post@posterous.com to set up a new blog or to add an existing one.
If you already have a blog and it doesn't accept posts by e-mail directly, you can e-mail images to your Flickr account and use the "Share This" link to post to most blogging platforms. Just set up a post-by-e-mail address at flickr.com/account/uploadbyemail and add the address to your iPhone's address book.
5. Find open Wi-Fi networks.
Find open Wi-Fi networks.
If you have an iPhone, you don't need a separate dongle to find an open wireless connection for your laptop. Simply take out your iPhone, tap Settings, select WiFi, then open Choose a network to see which Wi-Fi networks are available wherever you are. Perfect for checking to see if it's worth hauling out and booting up your laptop in your local library or coffee shop, or for checking whether your home network is visible from that corner of the garage or basement where you're considering moving your desktop.
WiFi Map
Want to find the nearest wireless access point wherever you are? Try searching for "wifi" in the Maps application. Google will plot the nearest hot spots around your location based on the GPS (or cell-phone tower location).

6. Give great speeches.
Your presentation is in 10 minutes and you just realized that you forgot to print out your presentation notes. Don't want your laptop obscuring your face while you speak? Save your document with a large typeface in Word, e-mail it to your iPhone, and open the attachment on your phone. You can easily scroll through your presentation with a touch while you're talking.
7. Scan documents.
The iPhone is no Canon Mark III, but it's pretty sweet for taking pictures of your friends or some cool scenery. Trouble is, its lack of a focus control makes it impossible to get clear close-up shots. Which is a shame considering there are services like Evernote and scanR that let you use the camera on your mobile phone as a scanner, even converting images into text or sending images as faxes.
What to do? Just put a magnifying glass or one of those credit-card-size magnifying sheets in front of the lens when taking close-up pictures. The improvement in the quality and clarity of your image will be stunning.
8. Take screenshots.
Capturing screenshots from any application or from the home screen is easy on the iPhone. Hold down the Home key and click the lock/off button on the top of the unit and you're done. The screen will flash white, and your iPhone will make the same shutter snap sound you get when you take a photo. Your screenshot will be added to the Camera Roll under the Photos app.
9. Slim down your wallet.
If you're like most people, your wallet contains far more cards than you use every day: grocery club cards, insurance cards, frequent flier cards, auto club cards, and who knows what else? Here's a cool idea: Scan or photograph these cards and store them on your iPhone instead. The screen is large and crisp enough that you can even scan barcodes from it—so if you scan, say, a grocery store customer loyalty card, you can simply hold the image of the barcode up to the barcode reader and get your sweet discounts. You might get some odd looks now and again, but your wallet—and your buttocks—will thank you for it.
10. Make it louder!
If you forgot your headphones or want to share your discoveries with your friends, try this neat trick: Lay your iPhone across the top of a cup to boost the sound. Since the speaker is at the bottom of the iPhone, you need to lay it off-center so the speaker projects into the cup. You'll get a nice boost to the iPhone's normally tinny sound. For more casual sound-boosting that's still guaranteed to make you look like a schmo, try cupping your hand around the speaker-end to direct the sound toward your ears.
Become a Tapping Master
Learn these special taps and button clicks to bring your iPhone to heel:
  • Tap the Status bar at the top of the screen (where the clock usually is) to return instantly to the top of long pages.
  • Hold a finger on a link in Safari to get a pop-up saying where the link goes.
  • Tap the bottom left or right corner to scroll left or right.
  • Tap with two fingers to zoom out in Maps.
  • Drag inside text boxes with two fingers to scroll without scrolling the whole page.
  • Double-click the Power/Lock button to send incoming calls straight to voice mail.
  • Double-click the Home button in any app to bring up the iPod controls.