Friday, May 16, 2014

Set Up A Self-Hosted WordPress Blog Or Website In 30 Minutes.

Ever wished you could have your own writer’s website or self-hosted blog without breaking the bank? I mean a real website, not a “mediocre.wordpress” or “mediocre.blogspot” stuff?
Well, here’s your chance.
Website Design
Today, I’ll show you step by step with screen shots, how to set up your own writer’s website or self-hosted blog in 30 minutes or less, with only N7,200 ($45) for the first 2 years. You don’t need any knowledge of coding or graphics design.
I’ll also show you how to lawfully get 3 amazing bonuses using the service I recommend:
  • Register a domain name for FREE and save N,2000 ($12.5);
  • Get a FREE Facebook advertising coupon worth N,8000 ($50) to promote your fan page on Facebook.
  • My ebook, SBS (How To Setup, Beautify & Secure Your Website). It’s value is  N6,100 ($37) but I’ll give you for FREE.
This is the guide I wish someone had given me 2 years ago when I started blogging. I had to learn it myself by trying and making a lot of mistakes and wasting a lot of time and money. But you can avoid all the failures and frustrations I tasted.
Benjamin Franklin said: “Experience is a hard master, but fools will have no other.” So don’t be a fool. I’ll tell you what works, so you can forget everything else.
First, let me briefly answer some questions you may have on your mind.

Why do you need a writer’s website?

You know writers are of two types: those who have a platform to build and keep their audience; and those who do not.
Platform is the reason Wole Soyinka, Chimamanda Adichie, Sam Omatseye and Linda Ikeji are household names. It’s the same reason some better writers are unknown … and they may die so.
If you have an idea to spread, or a product to sell, then you must do so through a platform. It’s easier than ever to use your words to make a difference.
Plus, a platform can help you:
  • Build an audience
  • Sell your products and services
  • Land more clients
  • Publish your books
  • Land speaking engagements, etc.

WordPress.com or self-hosted WordPress?

WordPress.com is free. It’s like managing on a friend’s land: there’re strict rules to live by, and there’re some nice things you may not do.
You can’t use custom emails (e.g., “info@mediocre.com”), plugins and premium themes. You can’t place adverts or do affiliate marketing. You can’t do some other awesome things. You’re really not in control.
If you only want to write once a month and you’re contented with average, WordPress.com can serve you right.
And if one day your friend wakes up and decides he no longer likes your face … and kicks your butt off his land, you’ll not need to cry, since your site is average anyway.
But you can invest a little and be your own boss. With a self hosted WordPress like “naijawriterscoach.com”, you’ll have your own domain name (e.g., “mediocre.com”), your hosting account and simply install the WordPress software on the domain.
That’s freedom. That’s independence. Think of anything online, you can do it with a self-hosted WordPress.

Resources needed to set up your website

To have a website, you need:
  • A hosting account (you’ll need a Mastercard, not a Verve card, to buy this. Your Mastercard ATM card can help here).
  • A domain name (I’ll show you how to get one for FREE below).

The simple, step-by-step process

In this free tutorial, I share my iPage affiliate link and when you make any purchase through the link, I get a little commission (at no extra cost to you) to buy coffee. But this didn’t influence my recommendation, because all hosting services have similar programs. I recommend iPage because I have personal experiences with them and honestly believe they offer amazing quality.
Now the process, step by step:

1: Get a hosting account with a FREE domain name from iPage

  • This is where your website “resides” online. I’ve used a Nigerian host in the past, but I regretted every second my site was hosted on it, and had to dump it after using only 3 months of the 1 year plan I purchased. The only hosting solution I recommend now is iPage. They are one of the leading web hosts on the Internet, and they offer 24/7 customer service. Currently, they’re running a promo with 77% discount. So you pay only Self-hosted WordPressN7,200 ($45) for the first 2 years and they even give you a FREE domain name (other hosts sell a domain name for about N,2000/$12.5). Just click the iPage link and then click “Sign Up Now”.
  • On the next page, choose “Register a new domain” and enter your desired domain name (e.g., “awesomenaija.com”). To make the domain name easy to remember, make it short and avoid numerals and hyphens. Click “Check availability”. If the domain name you choose is available, the next page loads. If not, you’ll be prompted to choose another domain name.
Self-hosted WordPress
  • Fill your detailsOn the next page, fill in your personal details and correct Mastercard details. Note that the zip code of Nigeria is 110001 or 23401 or 00176.
  • Uncheck “Domain privacy,” “Site protection” and “Site Backup” as you don’t need them. If you don’t uncheck them, you’ll be charged for them. Make sure your email is correct as you’ll receive vital information through it. Also note that the renewal of the hosting account is automatic. So use your own Mastercard. Finally, click “Checkout”.
(NB: Your sign up may be declined due to reasons like insufficient balance or incorrect card details. If that happens, you may receive an email or a pop-up window from iPage offering you a discounted $1 per month plan for the first 4 months.
DON’T accept the discounted offer. If you do, you’ll have to renew at the high fee of about N17,000 after just 4 months instead of after 2 years.
INSTEAD, come back to this tutorial and click the iPage sign up link to start again)
  • If the next page shows “Getting Started,” then your transaction is successful. You’ll be asked some questions (Just click “No Thanks” to skip them). On the next page, you’ll be prompted to buy some other things. Just scroll down and click “No Thanks“.
  • On the next page, click “Log In”. On the next page, choose a security question and answer, choose a password and in the box, “which website referred you?” enter “naijawriterscoach.com”. Click “Save & continue”.
Now you have a hosting account and a FREE domain name. Congratulations! 

2: Install WordPress on your domain name for FREE

  • Self-hosted WordPressAfter you’ve set your password above, your hosting account cPanel (short for Control Panel) is displayed. Locate and click the icon, “WordPress”.
  • On the next page, click “Start”.
  • On the next page, choose the version of your domain name without “www” and without “ipage”. Click “Check Domain”. The page prompts you that something already exists on the domain name. Check the box and click “Check Domain” again.
  • ipage 7On the next page, click “Show advanced options” and fill in your site name, username, password and email address. Note that the username cannot be changed later. The password could be the same thing as the one you chose earlier or a different one. Note that the username CANNOT be changed later. The username and password will be your login credentials whenever you want to post contents to your self-hosted WordPress blog.
  • Finally, agree to the terms and conditions and click “Install Now”. Within few seconds, your installation would be completed.
There you are! You’ve just installed WordPress on your domain name.

3: Login to your WordPress site and publish your first post

Self-hosted WordPressThis post doesn’t have to be perfect; it just has to be published. So go ahead and post any content.
  • Go to “http://yourdomain.com/wp-admin” (replace “yourdomain” with your domain name). Login with the username and password you chose when you installed WordPress in step #2 above.
  • The next page displays the dashboard, which is the “back side” of your website from where you set everything that appears on the “front side”. On the left side of your dashboard screen are menus. Position the mouse on Self-hosted WordPressPosts” and click “Add New” from the sub-menus that will pop out.
  • On the next page, enter the title of your post in the first tab and paste the content of your post in the second tab. Click “Publish”.
Self-hosted WordPress
  • On the next page, click “View post” to see the post you just published on the front end of your website or self hosted blog as it will appear to your visitors.
Hurray! You can now start sharing links to your site with your family and friends in less than 30 minutes.

Wednesday, April 23, 2014

This Is Why You Should Consider Internet Marketing!


In my quest to find the ultimate work from home opportunity, Internet Marketing appealed to me the most because I did not have to make any calls to anyone. I didn't have to ask the people in my life to buy anything, and I didn’t have to handle any product shipments. But most of all it attracted me because it was a pretty simple technique that had the potential to make a lot of money. People were leaving their jobs to work as internet marketers from home and they were making a nice chunk of change in the process. I wanted the same liberty.
Internet Marketing is one of the most lucrative and profitable businesses out there. The internet is our future and our world is forever evolving its technology to greater capacities. You can't go wrong with the internet business. Everybody is there. It has taken over the traditional market place. There are things you need to know about why internet marketing works.
1. It Increases Your Brand Awareness
Online Branding is the main reason for starting an Internet Marketing campaign. If you have any kind of idea, song, product, church, etc, you will want to use internet marketing to increase awareness to the masses. Improving your credibility online is vital to your success as a brand.
2. It Is Cost Effective
Marketing is important when starting a business, selling a book, or any other idea you want the world to know about. Technology is our future and our now. Meeting these changing demands will increase your brands visibility, and increase your sales. Television, radio, print ads, and word of mouth are still effective tools for marketing. But having an ongoing internet marketing campaign will bring life to your business and keep you fresh and relevant in this continually developing technology.
3. The ROI (Return On Investment) is Greater
A well-organized internet marketing campaign will bring in an abundant increase in sales. Whether through paid or free marketing [and yes you can do both]. Automatic purchasing power compared to driving to a store location or receiving a order form by mail will result in more revenue for your business. Because of the viral nature of the internet keeping it on going and expanding, it keeps a substantial flow of leads and an excellent return on investment.
4. You Can Target Specific Markets
The internet allows you endless opportunities to personalize your message to every type of audience. It always provides availability to your core audience. Your business can give people a 24 hour channel for finding the products and information they want and need. It also helps to maintain good communication to the consumer by keeping them interested and increasing customer loyalty even after they have purchased a product or visited your site for more information. A good internet marketing campaign will also work to help close a sale to someone who is undecided about their potential purchase.
5. It Increases Your Website Visibility
Without traffic driven to your website no one will know you exist. Traffic to your site, conversions, number of sales or subscribers, links, and brand image are just a few of the ways you can determine your websites success from your campaign. There are numerous things you can use to drive traffic to your business website. The more people who visit your site the more possible your chances are at having success. And you can do this for free.
Now that you have more information on why internet marketing works, you should get right to work with your brand awareness campaign! That is what I am doing! You should do it too! Let me encourage you to be patient with your process and stay consistent with driving traffic to your site. This will ensure your success on the internet.

A Guide to Cheap Android Tablets


If you are a gadget fanatic, you ought to have your hands upon the all new android tablets, which offer its users various features and great looks. The page below has been constructed with a few tips to help you buy Cheap Android Tablets matching to your preferences and needs.
Tablets make a huge demand these days and there are several reasons to why these devices are making a popular choice for various activities like reading, making notes, feeding and storing data, keeping up with the social media and surfing the internet. In short, you can deploy a tablet for various productive results and jobs. Here below, we have mentioned a few quick tips to help you know why are the tablets making a better demand in the market these days and how you can put your hands upon the latest range of versatile and Cheap Android Tablets.
1. Android tablets are designed with countless device configurations and ample storage to allow its user with easy and convenient feeding of data and personal information.
2. The tablets have Retina-like or even higher resolution display quality.
3. It is very easy to manage all the on-board files with an Android because the file system of these devices works with a traditional computing environment. You as the user can manage your files easily with an Android file manager or via a connected PC also.
4. Android are available with a micro SD card reader, with the help of which, you can expand the storage capacity of your gadget. Videocon Tab VT10 is a popular tablet from Videocon having a 10 inch touch screen interface running on Android 4.1 Jelly Bean operating system. The memory of this tablet can be increased to 32 GB with a micro SD card and above that, it has 8 GB ROM and an additional 1GB RAM to offer a new user experience to its user with the latest technology and product innovation.
If you wish to enjoy a true-to-life experience, you should buy an tablet because with the help of these all new android tablets, you can watch movies in high definition, search and browse the web easily, install third party applications, use all the social networking sites and much more. In short, the android tablet can serve you with an ultimate gadget in your hand, which is both user as well as pocket friendly.
And yes, do not be under the impression that the tablet is an expensive gadget, the price of the android is very less as compared to the other similar products available in the market. So, what are you waiting for? Buy your android tablet and be ready to experience everything that you have always imagined.

Tuesday, April 1, 2014

How to Connect Your Laptop/PC/Computer to Your TV

This article will teach you how to connect your PC or computer to a TV or HDTV using wired and wireless connections. You have many options these days, so it really depends on your hardware and budget. The most common method currently is still by connecting a cable from your laptop to your TV, so I’ll go over those first.
However, if you have bought a laptop like the MacBook Pro recently, then there is a way to wirelessly stream whatever is on your screen to your TV using Apple AirPlay. Unfortunately, there is nothing like that for Windows computers just yet, even with the release of Windows 8. This is one area where it’s advantageous to buy a Mac over  a PC because of the wirelessly streaming feature.

Connect Laptop to TV via Cable

S-Video

s video cable
Five years ago, this used to be the most common method for connecting a laptop to a TV because S-Video cables are cheap and just about every laptop and TV back then had a S-Video port. Nowadays, it’s rare to find a laptop with an s-video port, though lots of moderns TVs still include the port. Remember, there are two types of S-Video cables: 4-pin and 7-pin. Most laptops and PC’s are equipped with a 7-pin port, so if your TV only has a 4-pin S-Video port, then this method will not work or you’ll have to get an adapter.
S-Video picture quality is moderate and does not support high-definition video. Also, S-Video ports do not support audio, so you’ll have to buy a separate cable for that purpose. DVI and HDMI are best suited for HD signals.

VGA

vga cable
VGA, like S-Video, was another common port found on all laptops and TVs/computer screens back in the day. Again, you’ll still find the port on HDTVs and monitors, but not on laptops. Most desktops still support VGA and have VGA ports on the back. In terms of picture quality, VGA is bette than S-Video. Also, as with the S-Video cable, VGA cables are very cheap. VGA cables do not support audio, just like S-Video cables.

DVI

dvi cable
DVI stands for Digital Visual Interface with “digital” being the key word there. The digital signal will give a higher quality picture than either S-Video or VGA. Of course, your computer will need to have a DVI connection and your TV will need to be an HDTV. DVI cables used to be expensive, but now you can get them for $5 to $10 online. Also, DVI cables to do not support audio either, so you still need a separate cable for that.
DVI cables are also a bit complicated as you have DVI-I (Single Link), DVI-I (Dual Link), DVI-D (Single Link), DVI-D (Dual Link) and DVI-A. The reason why DVI became popular is because it supports analog connections also, namely VGA. You can buy a DVI to VGA adapter to convert between a DVI output and VGA input, etc.

HDMI

hdmi cable
HDMI (High-Definition Multimedia Interface) will give you the best quality picture on a HDTV. Even though HDMI is very popular, a lot of laptops still do not come with HDMI ports built-in. Luckily, HDMI is compatible with DVI, so you can get a HDMI to DVI cable to connect it to your HDTV. Unfortunately,  HDMI cables are pretty expensive these days. You can buy cheap ones, but you may not get the same quality picture as a more expensive cable.
There are also many versions and types (A thru E) of HDMI cables that support different features like audio, 3D over HDMI, Ethernet, and 4K resolution support. The best part about HDMI cables is that you get high-definition video and audio passed through the cable, which makes it very convenient when connection a laptop or PC to your HDTV.

DisplayPort

displayport cable
DisplayPort and Mini-DisplayPort are very similar to HDMI and DisplayPort is meant to complement HDMI, not replace it. The basic advantage to DisplayPort is that it can support up to 4 video and audio streams across one cable. That mean you could connect up to 4 monitors at 1920×1200 or 2 monitors at 2560×1600 pixels.
HDMI is still more popular, but you’ll find DisplayPort ports on Apple computers, the Microsoft Surface tablets, and even some Windows PCs. DisplayPort is also backwards compatible with VGA and DVI, which is nice.

Connect Laptop to TV Wirelessly

In addition to connecting your laptop to your TV using a cable, you can also wirelessly project your laptop display on your TV using new wireless technologies. I’ll mention a couple of the different technologies that currently exist and explain what hardware is needed. Unfortunately, the main reason wireless streaming of laptop and desktop displays to TVs has not become ubiquitous is because of the extra cost of the hardware needed.

Apple TV

apple tvIf you have a MacBook Pro,  MacBook Pro, MacBook Air, Mac Mini or iMac that is from 2011 or later, you can wireless stream your Apple laptop or desktop display to your TV using an Apple TV in full HD. The Apple TV is a separate hardware device that cost $99. Since only a few of the most recent Mac computers support AirPlay Mirroring, it’s not very popular.

Intel Wireless Display

intel wireless display
The AirPlay feature that is supported on Macs is one feature that has been missing on Windows computers for a long time. Luckily, things have changed and Intel has come out with a technology called Intel Wireless Display (WiDi), which lets you stream your laptop screen to an HDTV wirelessly.
Of course, the main downside with WiDi as with AirPlay technology is that it’s relatively new and therefore you can only use it if you have a PC that supports WiDi. If you’re planning on buying a new PC soon, you should look into whether the feature is supported or not as it can make streaming your laptop or PC screen to your HDTV relatively easy.
There are only a couple of HDTVs that support WiDi right now, but you can buy an adapter for any HDTV that will let you stream content to that TV from a WiDi enabled device.

Wireless Kits

If you don’t have any of those technologies built into your computer or want something that’s not proprietary, then you can buy wireless computer to HDTV kits. There are quite a few of these out there and I’ll link to some of the popular ones I’ve heard about myself.
Imation Link Wireless HD Audio/Video Extender - Supports up to 720p for video and can transmit audio also. Requires DisplayLink software, which is available for Mac and PC.
Veebeam HD – This kit supports 1080p wireless HD video and digital audio.
Netgear Push2TV – This works with the new Intel Wireless Display technology I mentioned above and needs a PC that supports WiDi. It doesn’t support the Mac OS at all as of right now.
So those are your options for connecting your laptop or PC to your TV via wired connection or wirelessly. The fastest and most reliable way is still via cable, but you if your computer supports the latest AirPlay or WiDi technology, you’ll be good to go. The wireless kits use sub-par technology and won’t give you as good results as the other technologies mentioned. Enjoy!

How to Change the Drive Letter in Windows XP for an External USB Stick or Hard Drive

This is a guide on how to change a drive letter in Windows XP for an external device. Here’s a common problem that I have seen: Plug a USB flash drive into your computer and it’s says ready to use, but for some reason nothing shows up in the list of drives. Take it out, plug it back in and still nothing shows up!!! What the heck is the problem? Well, it could be several things, but the most common issue is that the drive letter Windows is trying to assign to your device is already taken by some other drive or maybe mapped to a network drive.
Sadly, Windows XP does not figure this out itself (which is should) and your drive is basically lost in la-la land somewhere. In order to fix it, we need to go to Computer Management and change the drive letter there manually. There are two ways to get to the Computer Management dialog in Windows, one through Control Panel and the second by right-clicking My Computer and choosing Manage.

Right-click My Computer
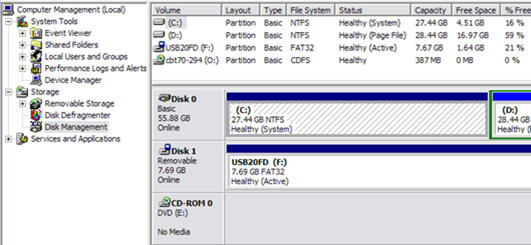
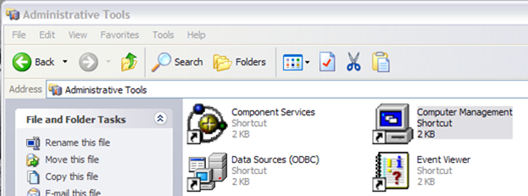
Computer Management in Administrative Tools
Click on Disk Management under the Storage section and the right side will show you all of the current drives and partitions on your drive. If you don’t know what that means, don’t worry, just find the drive you are looking for in the graphs at the bottom. They are usually named Disk 0, Disk 1, CD-ROM, CD-ROM1, etc. If you’re looking for a USB flash drive, you’ll see the word “Removable” underneath Disk X.

As you can see from my computer, I plugged in a USB flash drive and it’s currently assigned drive letter is F. If you want to change this, right-click in the white space to the right of the drive letter and choose Change Drive Letter and Paths.
Click the Change button in the dialog box and then pick a new letter from the drop-down list. Just for your info, the Mount in the following NTFS folder option is used if you had right clicked on an external hard drive and instead of giving it a drive letter, you wanted to just have it show up as a folder on your current hard drive. That means you could create a folder in My Documents called pictures that actually points to another hard drive instead of one where all of your My Documents are currently stored.
Click Ok twice and your drive should now have the new letter assigned. Usually, if you USB stick was not showing up before, once you change the letter, it will automatically pop up and ask you what you want to do. And that’s about it! You can also use Disk Management to format disks, determine the type of File System, and see the amount of free space available.

How to Format USB Drive and Memory Stick with NTFS

If you have ever tried to format a USB thumb drive or memory stick, you may have noticed that the only options you get are FAT and FAT32 file systems. This is the default behavior in Windows XP. However, with some slight tweaking of settings, you can actually format your removable storage devices in NTFS format, including external hard drives, etc.
Of course, there is a reason why Windows defaults the formatting of removable storage to FAT and FAT32. There are actually a few advantages and disadvantages to formatting a USB drive in NTFS format, so we’ll go through those before actually talking about how to do it.
The advantages of enabling NTFS of removable storage devices are mostly security related. For example, an NTFS file system lets you to add allow and deny permissions on individual files and folders for specific Windows users, something you cannot do in the FAT file system. But that’s not all in terms of security. You can also encrypt files using Windows XP’s built-in encryption.
Other benefits include the ability to compress files and therefore save space on your USB drive. You can also set disk quotas and even create partitions! Formatting USB drives in NTFS has several advantages that would be good if you need to use some of these advanced features, i.e. for your IT department or if you’re just paranoid!
However, there are also a few drawbacks to using NFTS on a USB drive. Firstly, there is a lot more writing to the drive that is required when using NTFS and therefore your access to the device will be slower. Will it make a major difference that would prevent people from using it? Probably not, but it’s something to consider. Also, versions of Windows older than 2000 cannot read NTFS file systems, nor can most Linux systems.
The other major downside is that if you encrypt your files on the USB drive, you will not be able to open them anywhere else. Actually, this can be considered a downside or an upside depending on what you want to do. If you want to secure your USB stick so that only your user account on your one computer can open the files, then encrypting is perfect. If not, then do not encrypt the files.

How to format USB drive with NTFS

First, connect your USB device to your computer. Then right-click on My Computer from the desktop and choose Manage.
manage my computer
Next click on Device Manager and then expand out Disk Drives. You should see your USB drive listed there as “Generic USB 2.0 USB Drive” or something similar.
usb disk drive
Now right-click on the USB drive under Disk Drives and choose Properties. Then go to the Policies tab.
optimize for performance
Now you will see two options, the “Optimize for quick removal” selected by default. Go ahead and change that by selecting the “Optimize for performance” option. This enables writing caching on the drive and therefore allows you to format it as NTFS! Sweet.
That’s it. Now click OK and then go to My Computer. Right click on the drive in My Computer and choose Format. In the File System drop down you will now see the option for NTFS!
file system ntfs
You can now secure your USB flash drive or external USB hard drive in any way you like! Enjoy!

How to Format External Hard Drive to FAT32 in Windows

Trying to format a large external USB or Firewire hard drive to the FAT32 file system? Can’t do it? Only see an option for formatting the drive using the NTFS file format? Well if you answered yes any of those questions, then you’re at the right place.
I was recently trying to format my 1 TB MyBook external hard drive in Windows XP to FAT32 instead of the overly forced-upon NTFS format. Why? Well because I needed to connect it to a NAS device and the NTFS permissions were causing the NAS not to be able to access the drive. Simple solution is to use FAT32, no security, no problems. Though it’s sometimes useful to format a USB drive in NTFS format.
Also, formatting a drive in FAT or FAT32 will allow it to be read by other operating systems, such as Mac, Linux, and older versions of Windows such as Windows 98.
Unfortunately, Windows XP and Windows Server 2003 will only format a removable drive in FAT32 if it’s less than 32GB! Hmmm…that pretty much cuts out ALL modern external hard drives!
However, Windows can format a drive that is larger than 32GB in FAT32, but you have to use the DOS command prompt. However, if you have a drive that is 1TB or larger, you may still get an error saying “The volume is too big for FAT32”.
In that case, you can use some 3rd party programs that will allow you to format an external hard drive with the larger size. Let’s go through the different methods. In case you are having problems getting your external hard drive to show up in Windows, read my article on how to change the drive letter for an external drive in Windows.

Format in FAT32 using Drive-Specific Tools

Before we get into using the command prompt and other third-party programs, it’s worth mentioning that some of the hard drive manufacturers have created their own tools for converting a drive which is larger than 32 GB to FAT32. Here is a list:
Seagate DiscWizard 
Western Digital FAT32 Formatting Tool

Format External Hard Drive in FAT32 using DOS

Open a command window by going to Start, then Run and typing in CMD.
command prompt
Now type in the following command at the prompt:
format /FS:FAT32 X:
Replace the letter X with the letter of your external hard drive in Windows. Windows will go ahead and begin formatting the drive in FAT32!
format external hard drive fat32
There seems to also be an issue when using the command line besides the size limit problem. Namely, it can take forever to format the hard drive for some users. Not sure why, but I’ve seen it enough times and it can be very frustrating to wait 5 hours and then have the whole format fail. If the format is taking longer than an hour, just cancel it and try one of the methods below first.

Format in FAT32 using Verbatim SmartDisk FAT32 Utility

There is a free utility called Verbatim FAT32 Tool which will allow you to convert your hard drive to FAT32 in seconds. I use to recommend a program called SwissKnife, which I mention below, but it’s no longer free and no one really needs to spend $10 to convert a hard drive from NTFS to FAT32. There are lots of other free tools and this Verbatim one is one of the better ones.
Just download it, unzip it and run the tool. It’s a standalone EXE file, so you don’t even have to install it on your system. Choose the drive you want to format, give it a Volume name and click Format Drive!
verbatim smartdisk
It’s a painfully simple program to use and it works really well. If you don’t even want to bother with the command prompt, just download this free tool and use it.

Format in FAT32 using FAT32Format

FAT32Format is another free tool you can use to get the job done. Choose the drive, the allocation unit size, give the volume a label, choose whether you want to do a quick format or not and then click Start.
fat32format

I would suggest not checking Quick Format so that way the entire drive is completely overwritten and you’re starting from scratch. I’ve tried this program and it was able to convert my 1TB hard drive to FAT32 without any issues. It did take longer than Verbatim, but I didn’t choose Quick Format, which probably would have been faster.

Format in FAT32 using FAT32Formatter

Another option is the FAT32Formatter program from Tokiwa. Using this program, you can see the different partitions on the hard disk and format just one partition to FAT32 instead of the whole drive. It’s probably best not to have a mix of NTFS and FAT32 partitions on one drive, but you can do it if you want or if you need to for some reason. This program will allow you to do that.
fat32formatter

Format in FAT32 using SwissKnife

SwissKnife is a nifty little program that used to be free, but not anymore, which you can use to format many types of external drives such as USB, Firewire, PCMIA, SATA and SCSI. The link points to the CNET page, which still has the older free version you can download. You can also use it to create partitions on an external hard drive and it formats faster than Windows.
swissknife
With SwissKnife, you may run into an issue where after the conversion to FAT32, you are left with only a small percentage of the original disk size. For example, if you format a 1TB drive, you might perform the conversion and end up with only 500 MB of space. This can be fixed by first reformatting the drive in NTFS format by performing a quick format.
Once you format the entire drive using NTFS, make sure to view the available space in Explorer and that it matches the size of the hard drive. Once you do that, go ahead and use SwissKnife to perform the conversion to FAT32.
So next time you want to format a hard drive in FAT32 and Windows only gives you an option for NTFS, make sure to follow one of the methods mentioned above. Enjoy!