Showing posts with label windows. Show all posts

Tuesday, April 1, 2014

How To boot Windows 8 into the System Recovery Options

Windows 8 has drastically redesigned the boot menu to not only look more modern, but also to be a lot easier to use. I have to say they have done a good job. All older versions of Windows used the basic DOS-looking text interface to choose options like Safe Mode or Advanced Boot Options.
windows 7 boot options
Most people didn’t even bother looking at anything below Safe Mode because it’s pretty technical for the average user. Now when you enter Windows 8 boot menu, you see a nice GUI interface that is Metro-styled. This is also called Windows RE (Recovery Environment) or the System Recovery Options.
windows 8 boot
You have three options: load Windows normally (Continue), Troubleshoot Windows or turn off your PC. A lot fewer choices to start off with, making it easier for people to use the tool. I know a lot of people who have had problems with Windows 7, but could not figure out how to load startup repair or get into Safe Mode. In this article, I’ll walk you through the steps and different methods to get into the boot menu.

Method 1 – SHIFT + Restart

One way to start Windows 8 in Windows Recovery Environment is to simply press SHIFT and then click on Restart. What’s good about this method is that you can do it from within Windows or you can do it even if no one is logged onto the system.
shift restart
So if you need to troubleshoot a Windows 8 machine or boot from a secondary device and you can’t log into the system, then you can still restart in Windows RE by clicking on the power button icon at the bottom right of the login screen.

Method 2 – PC Settings

The second way to do it is to go to PC Settings in Windows 8. You can do that by opening the Charms bar and then clicking on Settings.
settings
Then click on Change PC Settings at the bottom of the settings bar:
change pc settings
Finally, click on General and then click on Restart now under the Advanced startup section.
restart now

Method 3 – Automatic or Recovery Drive

Lastly, if Windows 8 detects any boot problem with the system, it will automatically load up Windows RE boot options. If your board supports the new UEFI firmware, this will happen automatically. If not, you would still need to press the F8 key, but you will not have a lot of time since Windows 8 loads so much faster.
Instead, the best way would be to use Methods 1 or 2. However, if you can’t boot into Windows 8 at all and the boot options don’t come up automatically, you’ll have to hope you created a Windows 8 USB Recovery Drive. A recovery drive in Windows 8 will basically let you create a bootable USB flash drive that will load the Windows RE environment in case it won’t load automatically and you can’t get into Windows.
I will cover how to create a recovery drive on a USB flash drive tomorrow, so come back soon to read that article! Enjoy!

How To Boot Windows 8 into Safe Mode

We all have gotten accustomed to pressing either F2 or F8 to get the advanced boot options since Windows 2000, probably even before that. In every version of Windows, you always could count on the slower boot process to actually press the key when the text message appeared.
press f8 for boot
Well, those days are gone! In Windows 8, the boot time has been dramatically decreased and the screenshot you see above appears for about 200 milliseconds and that’s it! So if you want to get into Safe Mode in Windows 8, you have to go a different route. Instead of the Advanced Boot Options of earlier versions of Windows, you now first have to go through the System Recovery Options of Windows 8. It’s pretty much the same thing, but just looks a lot nicer and you have to click a few more menu options to get there. Here’s how.

Startup Windows 8 in Safe Mode

To get started, you first need to boot Windows 8 into the System Recovery Options. You can read my previous post on how to do that; there are basically three methods. Once you are there, you need to click on the Troubleshoot option.
troubleshoot windows 8
On the next screen, you need to click on Advanced Options.
advanced options
Then you need to click on Startup Settings on the last dialog.
startup settings
Finally, you have to click on the Restart button, which will give you options to start up in low-resolution mode, debugging mode, enable boot logging, and start in safe mode! Kind of a long process, but that’s the new way.
safe mode
Now you will finally get to the Startup Settings screen, where you can press 1 thru 10 or F1 thru F10 to pick your different settings. Press 4 or F4 to enable Safe Mode.
enable safe mode
That’s it! Windows 8 will now load in Safe Mode! You’ll have to type in your password to log in once it starts back up. I noticed that while in Safe Mode in Windows 8, I could not bring up the Charms bar. Not sure why, but I could not figure out how to restart the system. What I ended up doing was going to the Start Screen, then clicking on my name at the top and there was an option to signed out. Once I signed, there was an option to Shutdown or Restart when I clicked on the Power button at the bottom right. So if you’re stuck in Safe Mode and can’t get out, that’s how do to it.
Also, it should be noted that you can use the MSCONFIG utility to startup in safe mode also. Go to the Start Screen, right-click, then choose All apps and then click on Run.
run command
Next, type in msconfig in the run dialog and then click on the Boot tab:
boot tab
Check the box that says Safe boot and then choose an option. You can pick from:
Minimal – Normal Safe Mode
Alternate shell - Safe Mode with command prompt
Network – Safe Mode with networking
Don’t worry about Active Directory repair, that’s some IT-related option. You can also check the boxes for No GUI boot, Boot log, Base video and OS boot information. Note that when you boot into safe mode using msconfig, it will continuously boot until you go back into msconfig and uncheck the Safe boot option. Enjoy!
Ultimate Windows 8 WiFi Troubleshooting Guide

If you’re running Windows 8 or recently upgraded, you might have run into some frustrating WiFi issues. Windows 8 is inherently a different beast than previous versions of Windows and with it comes a new set of problems. I never encountered too many wireless problems in Windows 7, but have run into several with Windows 8.
In this article, we’ll go through a couple of the most common problems with WiFi connections in Windows 8 and how to troubleshoot them. Most of the problems occur with those computers that got upgraded from Windows XP or Windows 7 to Windows 8. Either the driver is out of date or the adapter gets disabled or something odd like that. Let’s get started.

Limited Connectivity Message

If you’re getting that annoying limited connectivity message in your task bar in Windows 8, it’s really hard to tell what the problem is. You basically just have to try a couple of things and hope one works. The cause could be anything from the network adapter to the wireless router to a bad network cable. I’m only going to mention a few of the major reasons here, but scroll down to the Other Troubleshooting Tips section if none of these fix your problem.

Method 1 – Troubleshooter

The first thing you can try is to run a couple of the network troubleshooters built into Windows 8. A lot of the time, it can solve your wireless or Internet problem for you. To open the troubleshooter, open the search charm and type in troubleshooting. Then click on Troubleshooting, the first option.
Troubleshooting search
Now you want to click on Network and Internet.
Network and internet
Finally, you will see the different troubleshooters available for fixing wireless and Internet problems. The ones you will want to run are Internet Connections and Network Adapter.
Network troubleshooter

Method 2 – Reset TCP/IP in Windows 8

You might also get a message like this when running the troubleshooter:
WiFi does not have a valid ip configuration
In this case, you can reset the TCP/IP stack and Winsock and see if that works. To do this, again open the search charm and type in command prompt. On the first listing, right-click and choose Run as Administrator.
Command promt
At the command prompt, type in the following two commands, one at a time and make sure to press Enter after each one:
netsh winsock reset catalog
netsh int ip reset c:\resetlog.txt
Netsh reset
Hopefully, your wireless connection is working at this point. If not, skip down to the bottom section which has more troubleshooting tips.

WiFi is Disabled or Greyed Out

in one odd case, I had a Surface tablet where the wireless was disabled and I could not even enable it. For some odd reason, the On/Off toggle switch for Wireless Devices was greyed out like below:
Toggle switch
The first thing you can do is try to diagnose the connection. To do this, open Network and Sharing Center. You can simply right-click on the network icon in the task bar and choose it or you can open the search charm and type it in there.
Network sharing center
Now find the wireless connection at the top and click on the blue link:
Wireless connection
A new dialog will pop up and here you’ll see there is a Diagnose button. Go ahead and click on that and let Windows try to fix it for you.
Diagnose connection
The next thing you can try is to restart in Safe Mode, Network Enabled and try to turn on the Wireless there. For some reason on certain computers, the option is not greyed out in safe mode, so you might be able to enable it there and then restart in normally. Read my previous post on how to boot Windows 8 into safe mode.
The other thing you can try is to disable and then re-enable the wireless network adapter. Again, open Network and Sharing Center and then click on the Change adapter settings link at the left. You can see it in the second screenshot above this paragraph.
Disable network connection
Right-click on the wireless network adapter (not the Ethernet one like shown above) and then click on Disable. Once it’s disabled, go ahead and right-click again and then choose Enable. Now try to go to Wireless in PC Settings again and see if you can enable WiFi.
If this doesn’t work, again drop down to the last section which has more WiFi troubleshooting tips.

WiFi Not Connecting from Sleep or Hibernation

If your Windows 8 machine is disconnecting from the wireless network whenever you return from sleep or hibernation or any other standby state, then your problem is probably with a power-saving option set on the network card. To fix this, you need to open the search charm and type in Power Options.
Here, click on the selected plan and then click on Change plan settings.
Change plan settings
Then click on the Change advanced power settings link.
Change advanced settings
Now scroll down to Wireless Adapter Settings and make sure the Power Saving Mode is set to Maximum Performance.
Maximum performance

Other Troubleshooting Tips

Check Network Card at Compatibility Center

You can check to see if your wireless network card is compatible with Windows 8 by visiting the Capability Center. Go ahead and type in the name of your wireless card and you should get a little report like this:
Compatibility center
It’ll have a little blue logo if it is compatible or not. You can also check Windows RT in addition to just Windows 8. So this is a nice site to check out if you are having issues with your WiFi network, especially if it’s not showing up at all in Windows 8 or it’s got a yellow exclamation sign in Device Manager.

Check Network Adapter Settings

Open Network and Sharing Center, click on Change adapter settings and then right-click on then wireless network adapter and choose Properties.
Adapter properties
Now scroll down in the list box until you see Internet Protocol Version 4 (TCP/IPv4) and then click on the Properties button.
Ip4 properties
Finally, make sure the Obtain an IP address automatically and Obtain DNS server address automatically radio buttons are selected.
Obtain automatically

Check Wireless Switch

On most laptops, there is a wireless switch or button that can be toggled from on to off. Make sure you have that button set to On or press FN + F8 to enable the wireless card. The switch can be anywhere (sides, front, back, etc), but there is usually an indicator light so you can tell when it’s on.

Uninstall in Device Manager

Another quick tip is to go to Device Manager, right-click on your wireless network card and choose Uninstall. Then reboot your computer and it was automatically be detected and reinstalled. If it’s still not working after trying this, then read the next tip, which is updating the driver.

Update BIOS & Drivers

As always, it’s a good idea to download and install the latest drivers for your network card. This is especially important if you’re running Windows 8. As for the BIOS, I’ve always been the one to suggest not updating the BIOS unless it’s really needed. However, if you upgraded a computer from Windows XP or Windows 7 to Windows 8 and you tried everything above and updated the driver, then updating the BIOS might be worth it. 99% of the time updating the BIOS is just fine, but there are occasions when it fails and then leaves you with a computer you can’t boot. Only try this as a last resort and make a backup of your computer first just in case.

Reset the Router

If you’re getting the Limited Connectivity message, then you can try resetting the router. You can either restart it by just unplugging it, waiting about a minute and then plugging it back in. If that doesn’t work and you’ve tried all the stuff above, go ahead and reset your router. This will reset it to the default settings and will wipe out any security or configuration you had done earlier, so be careful and be ready to do that all again. It’s a last resort measure, but it could fix your problem.
Read my previous post on how to reset your router.

Remove Anti-Virus or Internet Security Suites

If you have something like AVG Internet Security or Avast or similar software installed on your PC or tablet, then go ahead and uninstall that program and see if your Internet connection starts to work. Many times Internet Security software has been the culprit and you could be pulling your hair out trying to figure out what’s causing the issue, so it’s worth trying.
So that’s a lot of stuff to try and practically every sane thing you can try. If none of this worked, then you could possibly have a hardware problem with your wireless card. If you have questions, feel free to post a comment. Enjoy!

Windows 8.1 Easy Guide To Troubleshooting Problems

Today’s article is a quick tip on how to troubleshoot problems in Windows 8.1, which you will most definitely run into using Microsoft’s shiny new OS. However, most problems don’t require booting into safe mode or following a 10 step guide to fixing WiFi problems.
Microsoft has also gotten smarter and included a lot of tools and help guides in the OS itself to diagnose and fix problems. I’ve found that teaching my clients how to use these built-in tools saves me a lot of time because they are able to fix problems in Windows 8.1 themselves. In this article, I’m going to talk about the built-in Windows 8.1 troubleshooters that can help you fix common problems.

Windows 8.1 Troubleshooters

Before I show you some of the troubleshooters, let’s see how to get to them in Windows 8.1. First, open the Charms bar by pressing Windows key + C or moving your mouse to the upper or lower right of your screen. Click on Search and then type in troubleshooting in the search box.
charms search troubleshooting
Click on the first result, Troubleshooting, and the main window will pop up where you can start troubleshooting computer programs. The main interface is broken down into categories like Programs, Hardware and Sound, Network and Internet and System and Security.
troubleshooting control panel
You can either choose from the list that is shown or you can click the View all link at the top left. I tend to click on that just so I can see all the options.
troubleshooting windows 8
As you can see, there are quite a few troubleshooters. You can fix problems with a homegroup, troubleshoot Internet connection issues, check the configuration of your network adapters, get help with printing problems, fix sound issues, fix Windows Updates problems and lots more. If you click on one of the troubleshooters, you’ll get a pop up dialog like below:
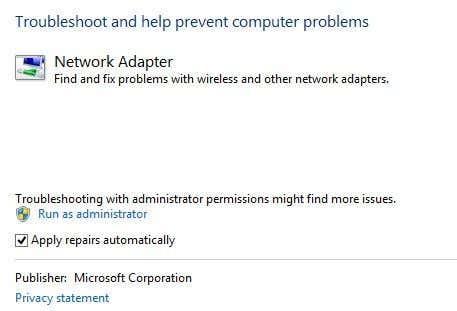
troubleshoot network adapter
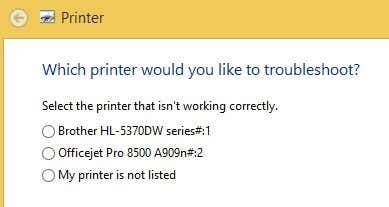
All of them will have a little Advanced button at the bottom, which you want to click on to see more options. It’s a good idea to keep the Apply repairs automatically checked and to click the Run as administrator link. Running the troubleshooter as an Administrator will allow windows to find more possible issues. When you click Next, the troubleshooter will start trying to detect any issues. For example, when I ran the Printer troubleshooter, it checked the spool service for errors and gave me a list of printers to see which one I was having trouble with.
troubleshoot printer
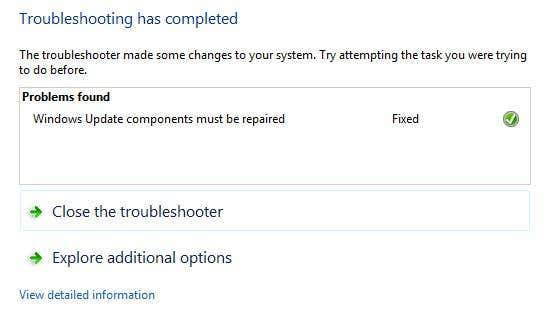
Before Windows 7, these troubleshooters were pretty useless and didn’t do much of anything. However, starting with Windows 7 and definitely more so in Windows 8, they can actually fix a wide range of issues without any user input. If there is an issue detected, the troubleshooter will attempt to repair the problem by itself. Most of the time this works, unless it’s a serious problem. On one Windows 8.1 computer, I had some Windows Update issues that were fixed by the troubleshooter:
troubleshooting completed
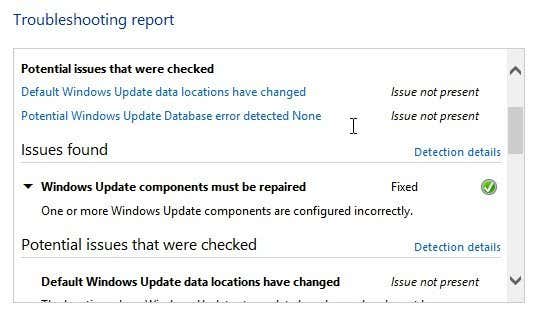
You can click on View detailed information to see exactly what issue was detected and fixed. In my case, it looked like one of the components for Windows Update was configured incorrectly.
error detailed informationThat’s about it! Using the troubleshooters built into Windows 8.1 is always a good first step. If the troubleshooter doesn’t work, it’s time to start Googling around for a solution, but hopefully you won’t have too. Enjoy!

Wednesday, March 26, 2014

How To Use the File History Feature in Windows 8 to Restore Files


Do you understand the depth of adversity that PC data loss can cause? If statistics are to be believed then in the US more than 31% of PC users have lost their files under disaster events beyond their control. Highly risky situations like Windows or hardware crash can happen any time and before you would realize the issue, all your important data and files will be lost forever. According to records, in the United States every week 140,000 hard drives crash, which sounds highly alarming. So it is important to have proper backup arrangement for the files saved in your PC.
What is File History?
Microsoft has introduced a new backup service called File History in Windows 8 that would create safety copies of your important personal files to prepare a backup. This will keep you always prepared for the worst. File History is said to be more advanced than Windows Backup feature that was built into Windows 7. The process happens automatically and the backup files get saved on any network drive or external hard disk. By default the feature remains off, and has to be turned-on.
While the Windows Backup process in Windows 7 was limited to make copies of files only on a daily, weekly or monthly basis, the Windows 8 File History has much advanced features. By default, it makes continuous and automatic backups of the files after every hour. However, if you want your File History to make more frequent restores then you can easily change the default time interval through advance setting. Also, at any point of time if you want to manually run the service, then you can easily do that as well. File store appears in the task manager as fhsvc.
So, File History is an advance and useful feature in Windows 8 that allows you to restore your lost or corrupted files. Hence, you must turn on the File History in your system to avoid loss of data under risky situation like Windows or hard drive crash and others.
It is very easy to use this service and you must use it. Once you turn it on and perform the needful setting steps you can forget all about it. It will of its own perform its job of securing your important files continuously.
Read below to master the tips on how to configure File History on Windows 8 and how to restore files even after a disastrous loss of files.
How to Configure File History on Windows 8?
  • To turn on the File history feature in your Windows, first go to the search of the start screen and type File History. In the search results, under "Settings" you will get the File history panel. If you are not comfortable working with the start screen, then you can directly go to the Control Panel, and there in the ‘System and Security' section you will find the folder for File History.
  • Once you open the folder, it will automatically detect an external drive connected to your PC. However, if you want to save the backup files in some other location like the network drive, then you can manually chose the destination by clicking the "Select Drive" link that appears on the left side.
  • After choosing the destination, click on "Turn On" button located at the right side of the Windows to activate the File History.
  • Once you are done with this setting, File History will continue maintaining the backup for all your files like documents, music, photos and videos.
How to Restore Files Using File History on Windows 8?
At any time if you want to restore the old files, which have been saved as backup files, you need to perform the following steps:
  • Go to Control Panel > System and Security > File History
  • Open the File History in Control Panel and look for the ‘Restore personal files' link towards left side.
  • This will open up the folders of the recently saved files. If you want to look for the folders of earlier date you can move to those folders by clicking on the back and forward navigation buttons located at the base of the window with a blue colored Refresh button at the center.
  • After deciding the file you want to restore, right-click on it. Here you will get two options "Restore" and "Restore to." If you click on "Restore" then the backup file will get restored at the current location of that file and it will completely replace the current file. But if you click on "Restore to" then you will be allowed to choose a new location for the restored files. Thus both the files (current and restored one) will be intact.
File History works with files stored in Libraries, Contacts, Desktop, and Favorites folders in your system. It can make backup copies of all types of files such as documents, music, videos, music, etc. Its only limitation is that it can't backup those files or folders that you have synced with cloud storage services.

How to Unlock Laptop Password with Windows Password Recovery Tool Ultimate?


Have you met the situation that you cannot get your own computer password to access Windows system? Have you ever changed your Windows administrator password but can't remember that password? There are various situations that make you lose your login password.

Here, I will explain to you how you can reset your administrator password that has been lost in Microsoft Windows 8, 7, Vista and XP. Windows system stores user information, including encrypted user account passwords. There is a file named Sam and usually located in C: windowssystem32config. This file is part of the Windows registry, in binary format and inaccessible. We will use a utility called Windows Password Recovery Tool Ultimate to retrieve our password. This program is compatible with Microsoft Windows 7/8/95/98/ME, Windows NT/2000/2003/SBS2003, Windows Vista/XP, etc.

What is Windows Password Recovery Tool Ultimate?
It is a known Windows Password Recovery program that could be used to reset any Windows operating system's forgotten user passwords without administrator privileges. This program is used to burn an ISO image file to a bootable CD/DVD/USB disk.

Windows Password Recovery Tool Ultimate can help change local/domain administrator and users password, and also create a new local or domain administrator account.

How to reset forgotten Windows password with Windows Password Recovery Tool Ultimate?
Step 1: On an accessible pc with Internet, go to the official site http://www.windowspasswordsrecovery.com , download the utility and save it on this pc. Extract the downloaded .exe file that containing the ISO image Windows Password Recovery Tool Ultimate.

Step 2: Once you get the ISO image file, it must be burned into to CD/DVD/USB disk with your favorite recording program. If you do not have one, try free ImgBurn or BurnCDCC. If you do not have a CD/DVD, you can make a copy on an USB flash drive with the former programs, also use the ISO2Disc program.

Step 3: Insert your burned CD/DVD/USB disk into computer drive and start your locked pc. When you turn on the computer, press F1 or the Esc key to enter the CMOS and set your computer's CD/DVD/USB as the first boot option. Then computer will read your CD/DVD/USB disk to start the Windows Password Recovery Tool Ultimate program.

Step 4: The locked computer will start with the Windows Password Recovery Tool Ultimate immediately. From there, you can see a list of existing Windows accounts on the local computer. Select a user and click the "Remove the Password" button to clear password as blank or input new password to set a new one. Then, you can reset or unlock your lost password instantly.

If you don't want to read the above boring steps, you can watch the video http://www.youtube.com/watch?v=k9T15rqUGQk and follow its procedure to unlock pc with step-by-step guide.