Showing posts with label pc. Show all posts

Tuesday, April 1, 2014

How to Format USB Drive and Memory Stick with NTFS

If you have ever tried to format a USB thumb drive or memory stick, you may have noticed that the only options you get are FAT and FAT32 file systems. This is the default behavior in Windows XP. However, with some slight tweaking of settings, you can actually format your removable storage devices in NTFS format, including external hard drives, etc.
Of course, there is a reason why Windows defaults the formatting of removable storage to FAT and FAT32. There are actually a few advantages and disadvantages to formatting a USB drive in NTFS format, so we’ll go through those before actually talking about how to do it.
The advantages of enabling NTFS of removable storage devices are mostly security related. For example, an NTFS file system lets you to add allow and deny permissions on individual files and folders for specific Windows users, something you cannot do in the FAT file system. But that’s not all in terms of security. You can also encrypt files using Windows XP’s built-in encryption.
Other benefits include the ability to compress files and therefore save space on your USB drive. You can also set disk quotas and even create partitions! Formatting USB drives in NTFS has several advantages that would be good if you need to use some of these advanced features, i.e. for your IT department or if you’re just paranoid!
However, there are also a few drawbacks to using NFTS on a USB drive. Firstly, there is a lot more writing to the drive that is required when using NTFS and therefore your access to the device will be slower. Will it make a major difference that would prevent people from using it? Probably not, but it’s something to consider. Also, versions of Windows older than 2000 cannot read NTFS file systems, nor can most Linux systems.
The other major downside is that if you encrypt your files on the USB drive, you will not be able to open them anywhere else. Actually, this can be considered a downside or an upside depending on what you want to do. If you want to secure your USB stick so that only your user account on your one computer can open the files, then encrypting is perfect. If not, then do not encrypt the files.

How to format USB drive with NTFS

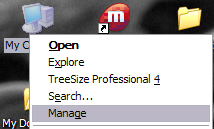
First, connect your USB device to your computer. Then right-click on My Computer from the desktop and choose Manage.
manage my computer
Next click on Device Manager and then expand out Disk Drives. You should see your USB drive listed there as “Generic USB 2.0 USB Drive” or something similar.
usb disk drive
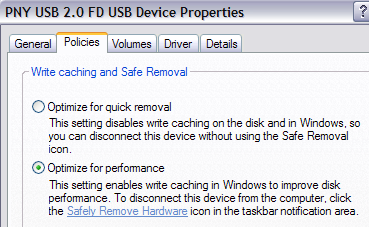
Now right-click on the USB drive under Disk Drives and choose Properties. Then go to the Policies tab.
optimize for performance
Now you will see two options, the “Optimize for quick removal” selected by default. Go ahead and change that by selecting the “Optimize for performance” option. This enables writing caching on the drive and therefore allows you to format it as NTFS! Sweet.
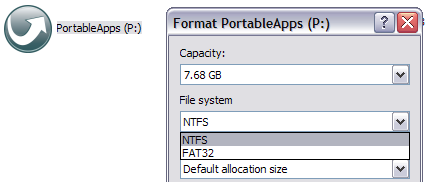
That’s it. Now click OK and then go to My Computer. Right click on the drive in My Computer and choose Format. In the File System drop down you will now see the option for NTFS!
file system ntfs
You can now secure your USB flash drive or external USB hard drive in any way you like! Enjoy!

How to Format External Hard Drive to FAT32 in Windows

Trying to format a large external USB or Firewire hard drive to the FAT32 file system? Can’t do it? Only see an option for formatting the drive using the NTFS file format? Well if you answered yes any of those questions, then you’re at the right place.
I was recently trying to format my 1 TB MyBook external hard drive in Windows XP to FAT32 instead of the overly forced-upon NTFS format. Why? Well because I needed to connect it to a NAS device and the NTFS permissions were causing the NAS not to be able to access the drive. Simple solution is to use FAT32, no security, no problems. Though it’s sometimes useful to format a USB drive in NTFS format.
Also, formatting a drive in FAT or FAT32 will allow it to be read by other operating systems, such as Mac, Linux, and older versions of Windows such as Windows 98.
Unfortunately, Windows XP and Windows Server 2003 will only format a removable drive in FAT32 if it’s less than 32GB! Hmmm…that pretty much cuts out ALL modern external hard drives!
However, Windows can format a drive that is larger than 32GB in FAT32, but you have to use the DOS command prompt. However, if you have a drive that is 1TB or larger, you may still get an error saying “The volume is too big for FAT32”.
In that case, you can use some 3rd party programs that will allow you to format an external hard drive with the larger size. Let’s go through the different methods. In case you are having problems getting your external hard drive to show up in Windows, read my article on how to change the drive letter for an external drive in Windows.

Format in FAT32 using Drive-Specific Tools

Before we get into using the command prompt and other third-party programs, it’s worth mentioning that some of the hard drive manufacturers have created their own tools for converting a drive which is larger than 32 GB to FAT32. Here is a list:
Seagate DiscWizard 
Western Digital FAT32 Formatting Tool

Format External Hard Drive in FAT32 using DOS

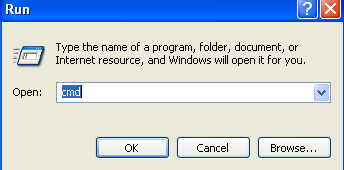
Open a command window by going to Start, then Run and typing in CMD.
command prompt
Now type in the following command at the prompt:
format /FS:FAT32 X:
Replace the letter X with the letter of your external hard drive in Windows. Windows will go ahead and begin formatting the drive in FAT32!
format external hard drive fat32
There seems to also be an issue when using the command line besides the size limit problem. Namely, it can take forever to format the hard drive for some users. Not sure why, but I’ve seen it enough times and it can be very frustrating to wait 5 hours and then have the whole format fail. If the format is taking longer than an hour, just cancel it and try one of the methods below first.

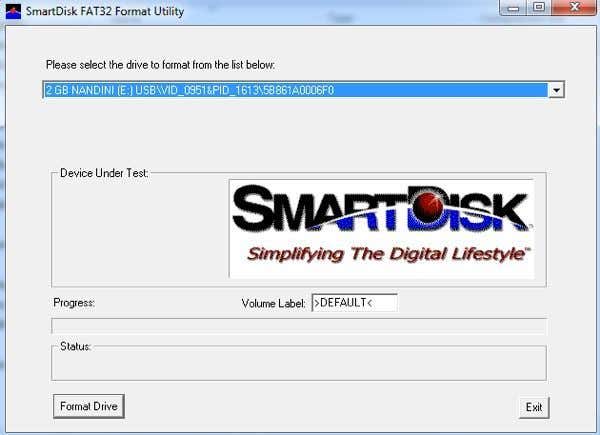
Format in FAT32 using Verbatim SmartDisk FAT32 Utility

There is a free utility called Verbatim FAT32 Tool which will allow you to convert your hard drive to FAT32 in seconds. I use to recommend a program called SwissKnife, which I mention below, but it’s no longer free and no one really needs to spend $10 to convert a hard drive from NTFS to FAT32. There are lots of other free tools and this Verbatim one is one of the better ones.
Just download it, unzip it and run the tool. It’s a standalone EXE file, so you don’t even have to install it on your system. Choose the drive you want to format, give it a Volume name and click Format Drive!
verbatim smartdisk
It’s a painfully simple program to use and it works really well. If you don’t even want to bother with the command prompt, just download this free tool and use it.

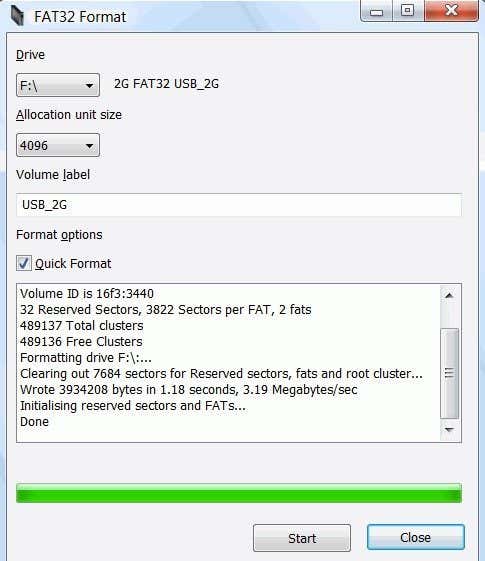
Format in FAT32 using FAT32Format

FAT32Format is another free tool you can use to get the job done. Choose the drive, the allocation unit size, give the volume a label, choose whether you want to do a quick format or not and then click Start.
fat32format

I would suggest not checking Quick Format so that way the entire drive is completely overwritten and you’re starting from scratch. I’ve tried this program and it was able to convert my 1TB hard drive to FAT32 without any issues. It did take longer than Verbatim, but I didn’t choose Quick Format, which probably would have been faster.

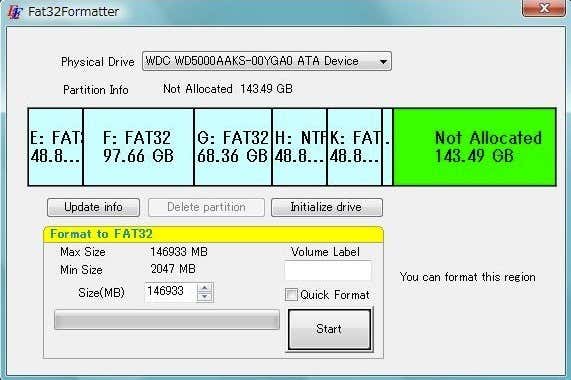
Format in FAT32 using FAT32Formatter

Another option is the FAT32Formatter program from Tokiwa. Using this program, you can see the different partitions on the hard disk and format just one partition to FAT32 instead of the whole drive. It’s probably best not to have a mix of NTFS and FAT32 partitions on one drive, but you can do it if you want or if you need to for some reason. This program will allow you to do that.
fat32formatter

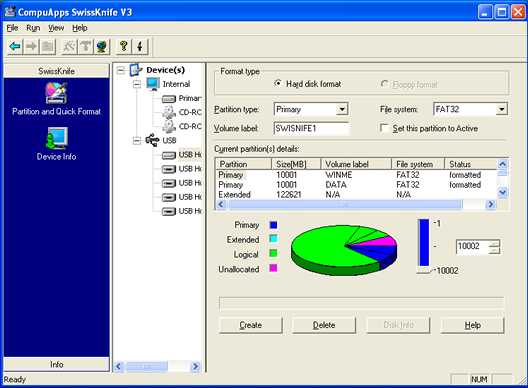
Format in FAT32 using SwissKnife

SwissKnife is a nifty little program that used to be free, but not anymore, which you can use to format many types of external drives such as USB, Firewire, PCMIA, SATA and SCSI. The link points to the CNET page, which still has the older free version you can download. You can also use it to create partitions on an external hard drive and it formats faster than Windows.
swissknife
With SwissKnife, you may run into an issue where after the conversion to FAT32, you are left with only a small percentage of the original disk size. For example, if you format a 1TB drive, you might perform the conversion and end up with only 500 MB of space. This can be fixed by first reformatting the drive in NTFS format by performing a quick format.
Once you format the entire drive using NTFS, make sure to view the available space in Explorer and that it matches the size of the hard drive. Once you do that, go ahead and use SwissKnife to perform the conversion to FAT32.
So next time you want to format a hard drive in FAT32 and Windows only gives you an option for NTFS, make sure to follow one of the methods mentioned above. Enjoy!

How To boot Windows 8 into the System Recovery Options

Windows 8 has drastically redesigned the boot menu to not only look more modern, but also to be a lot easier to use. I have to say they have done a good job. All older versions of Windows used the basic DOS-looking text interface to choose options like Safe Mode or Advanced Boot Options.
windows 7 boot options
Most people didn’t even bother looking at anything below Safe Mode because it’s pretty technical for the average user. Now when you enter Windows 8 boot menu, you see a nice GUI interface that is Metro-styled. This is also called Windows RE (Recovery Environment) or the System Recovery Options.
windows 8 boot
You have three options: load Windows normally (Continue), Troubleshoot Windows or turn off your PC. A lot fewer choices to start off with, making it easier for people to use the tool. I know a lot of people who have had problems with Windows 7, but could not figure out how to load startup repair or get into Safe Mode. In this article, I’ll walk you through the steps and different methods to get into the boot menu.

Method 1 – SHIFT + Restart

One way to start Windows 8 in Windows Recovery Environment is to simply press SHIFT and then click on Restart. What’s good about this method is that you can do it from within Windows or you can do it even if no one is logged onto the system.
shift restart
So if you need to troubleshoot a Windows 8 machine or boot from a secondary device and you can’t log into the system, then you can still restart in Windows RE by clicking on the power button icon at the bottom right of the login screen.

Method 2 – PC Settings

The second way to do it is to go to PC Settings in Windows 8. You can do that by opening the Charms bar and then clicking on Settings.
settings
Then click on Change PC Settings at the bottom of the settings bar:
change pc settings
Finally, click on General and then click on Restart now under the Advanced startup section.
restart now

Method 3 – Automatic or Recovery Drive

Lastly, if Windows 8 detects any boot problem with the system, it will automatically load up Windows RE boot options. If your board supports the new UEFI firmware, this will happen automatically. If not, you would still need to press the F8 key, but you will not have a lot of time since Windows 8 loads so much faster.
Instead, the best way would be to use Methods 1 or 2. However, if you can’t boot into Windows 8 at all and the boot options don’t come up automatically, you’ll have to hope you created a Windows 8 USB Recovery Drive. A recovery drive in Windows 8 will basically let you create a bootable USB flash drive that will load the Windows RE environment in case it won’t load automatically and you can’t get into Windows.
I will cover how to create a recovery drive on a USB flash drive tomorrow, so come back soon to read that article! Enjoy!

How To Boot Windows 8 into Safe Mode

We all have gotten accustomed to pressing either F2 or F8 to get the advanced boot options since Windows 2000, probably even before that. In every version of Windows, you always could count on the slower boot process to actually press the key when the text message appeared.
press f8 for boot
Well, those days are gone! In Windows 8, the boot time has been dramatically decreased and the screenshot you see above appears for about 200 milliseconds and that’s it! So if you want to get into Safe Mode in Windows 8, you have to go a different route. Instead of the Advanced Boot Options of earlier versions of Windows, you now first have to go through the System Recovery Options of Windows 8. It’s pretty much the same thing, but just looks a lot nicer and you have to click a few more menu options to get there. Here’s how.

Startup Windows 8 in Safe Mode

To get started, you first need to boot Windows 8 into the System Recovery Options. You can read my previous post on how to do that; there are basically three methods. Once you are there, you need to click on the Troubleshoot option.
troubleshoot windows 8
On the next screen, you need to click on Advanced Options.
advanced options
Then you need to click on Startup Settings on the last dialog.
startup settings
Finally, you have to click on the Restart button, which will give you options to start up in low-resolution mode, debugging mode, enable boot logging, and start in safe mode! Kind of a long process, but that’s the new way.
safe mode
Now you will finally get to the Startup Settings screen, where you can press 1 thru 10 or F1 thru F10 to pick your different settings. Press 4 or F4 to enable Safe Mode.
enable safe mode
That’s it! Windows 8 will now load in Safe Mode! You’ll have to type in your password to log in once it starts back up. I noticed that while in Safe Mode in Windows 8, I could not bring up the Charms bar. Not sure why, but I could not figure out how to restart the system. What I ended up doing was going to the Start Screen, then clicking on my name at the top and there was an option to signed out. Once I signed, there was an option to Shutdown or Restart when I clicked on the Power button at the bottom right. So if you’re stuck in Safe Mode and can’t get out, that’s how do to it.
Also, it should be noted that you can use the MSCONFIG utility to startup in safe mode also. Go to the Start Screen, right-click, then choose All apps and then click on Run.
run command
Next, type in msconfig in the run dialog and then click on the Boot tab:
boot tab
Check the box that says Safe boot and then choose an option. You can pick from:
Minimal – Normal Safe Mode
Alternate shell - Safe Mode with command prompt
Network – Safe Mode with networking
Don’t worry about Active Directory repair, that’s some IT-related option. You can also check the boxes for No GUI boot, Boot log, Base video and OS boot information. Note that when you boot into safe mode using msconfig, it will continuously boot until you go back into msconfig and uncheck the Safe boot option. Enjoy!

Windows 8.1 Easy Guide To Troubleshooting Problems

Today’s article is a quick tip on how to troubleshoot problems in Windows 8.1, which you will most definitely run into using Microsoft’s shiny new OS. However, most problems don’t require booting into safe mode or following a 10 step guide to fixing WiFi problems.
Microsoft has also gotten smarter and included a lot of tools and help guides in the OS itself to diagnose and fix problems. I’ve found that teaching my clients how to use these built-in tools saves me a lot of time because they are able to fix problems in Windows 8.1 themselves. In this article, I’m going to talk about the built-in Windows 8.1 troubleshooters that can help you fix common problems.

Windows 8.1 Troubleshooters

Before I show you some of the troubleshooters, let’s see how to get to them in Windows 8.1. First, open the Charms bar by pressing Windows key + C or moving your mouse to the upper or lower right of your screen. Click on Search and then type in troubleshooting in the search box.
charms search troubleshooting
Click on the first result, Troubleshooting, and the main window will pop up where you can start troubleshooting computer programs. The main interface is broken down into categories like Programs, Hardware and Sound, Network and Internet and System and Security.
troubleshooting control panel
You can either choose from the list that is shown or you can click the View all link at the top left. I tend to click on that just so I can see all the options.
troubleshooting windows 8
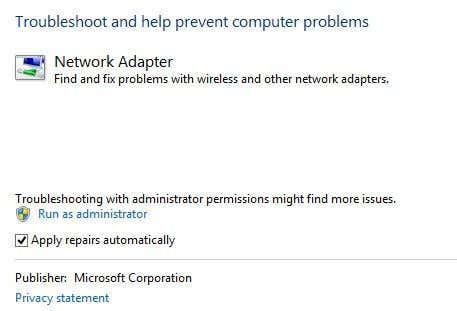
As you can see, there are quite a few troubleshooters. You can fix problems with a homegroup, troubleshoot Internet connection issues, check the configuration of your network adapters, get help with printing problems, fix sound issues, fix Windows Updates problems and lots more. If you click on one of the troubleshooters, you’ll get a pop up dialog like below:
troubleshoot network adapter
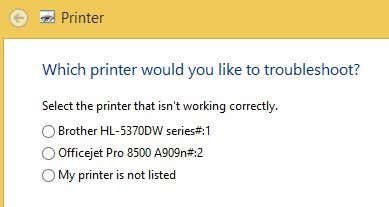
All of them will have a little Advanced button at the bottom, which you want to click on to see more options. It’s a good idea to keep the Apply repairs automatically checked and to click the Run as administrator link. Running the troubleshooter as an Administrator will allow windows to find more possible issues. When you click Next, the troubleshooter will start trying to detect any issues. For example, when I ran the Printer troubleshooter, it checked the spool service for errors and gave me a list of printers to see which one I was having trouble with.
troubleshoot printer
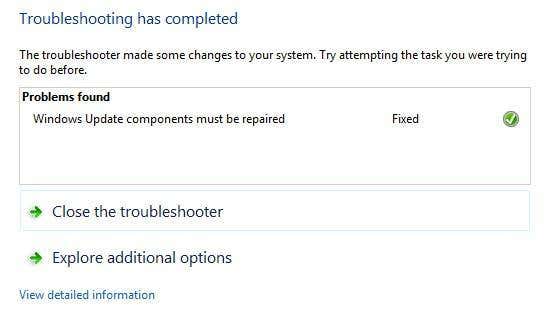
Before Windows 7, these troubleshooters were pretty useless and didn’t do much of anything. However, starting with Windows 7 and definitely more so in Windows 8, they can actually fix a wide range of issues without any user input. If there is an issue detected, the troubleshooter will attempt to repair the problem by itself. Most of the time this works, unless it’s a serious problem. On one Windows 8.1 computer, I had some Windows Update issues that were fixed by the troubleshooter:
troubleshooting completed
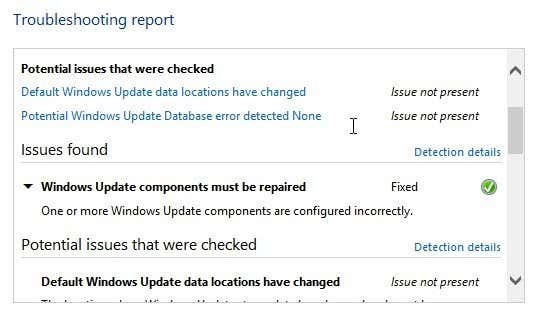
You can click on View detailed information to see exactly what issue was detected and fixed. In my case, it looked like one of the components for Windows Update was configured incorrectly.
error detailed informationThat’s about it! Using the troubleshooters built into Windows 8.1 is always a good first step. If the troubleshooter doesn’t work, it’s time to start Googling around for a solution, but hopefully you won’t have too. Enjoy!

Friday, March 28, 2014

Five Best Computer Maintainance Practices

A few years ago, Steve King, Johnnie Putman, and the rest of the gang at WGN Radio's Website Wednesday night came up with what we call the "weekly fab five," the five things you should do every week to keep your computer running in tip-top shape. Here is what we recommend.

1. Update your Virus Definitions

At the end of July 2005, Symantec's Norton Antivirus knew of over 70,000 different computer viruses. Worse still, nearly 5,000 new viruses are discovered each and every year.
Before you panic, though, there are two things to keep in mind:
  1. Even though it sounds like there are a squillion viruses out there, there are really only a couple hundred different viruses actively floating around the net at any point in time. The rest exist only in the laboratories of evil virus scientists.

  2. Many viruses are easy to detect and neutralize before they do any damage, but only if you have an antivirus program using the latest virus definitions. Virus definitions help your antivirus program both recognize and (hopefully) destroy known viruses. What happens if you don't have the latest virus definitions? Well, your antivirus program may not be able to detect some of the newer viruses floating around the Net, putting your computer and files in danger.
Fortunately, updating your virus definitions is a snap. How do you do it? That depends on the antivirus program you use. Norton Antivirus has a "Live Update" button built into it; click on the button, and Norton automatically downloads and installs the latest virus definitions from Net. McAfee VirusScan has a similar update function (go to File > Update VirusScan).
Live Update in Norton System Works
If you are unsure of how to update your virus definitions, visit the Web site of your antivirus software manufacturer and look for their "download," "update," or "technical support" section. And if you are on AOL, you can find the latest definitions for most antivirus programs at keyword: virus.
Do Mac users have to update their virus definitions every week? The answer is an emphatic YES! While there are certainly more PC viruses than Mac viruses, the possibility of new Mac viruses, while slight, is still greater than zero. And the possibility of future, cross-platform viruses (viruses that infect both PCs and Macs) is also quite real. Better safe than sorry.
By the way, if you want to know more about what viruses are, how they spread, and how to avoid them in the first place, check out
http://www.g4tv.com/techtvvault/features/34602/Viruses_Explained.html
So, the first thing we should do every week is update our virus definitions. The second thing we should do is ...

2. Run Windows Update/Software Update

Okay, I'll admit that running Windows Update or Apple's Software Update once a week is overkill. Sue me.
Windows is aptly named because it is full of holes. There are several, inadvertent 'open doors' (or 'security holes') in the Windows operating system that COULD conceivably make your computer vulnerable to outside attack. In specific, a mean-spirited hacker COULD 'walk through' one of these open doors on your Windows PC and read any file on your computer, delete specific files or programs, or even completely erase your hard drive.
When the folks at Microsoft discover a security hole, they usually release a software patch to close it. Without the patch—and there are MANY—your computer may be open to outside attack.
Fortunately, like updating your virus definitions, downloading these patches couldn't be simpler. Built into every PC since Windows 98 and into every version of Microsoft's Internet Explorer since version 4.0 is something called "Windows Update." Windows Update is an easy-to-use tool that helps you ensure that your PC is running the absolute latest Microsoft software patches and drivers.
Here is how to use Windows Update to download all of the security patches Microsoft has released since your PC was made:
  1. Connect (or logon) to the Internet.

  2. Open Internet Explorer and go to Tools > Windows Update.
    Tools > Windows Update in Internet Explorer

  3. On the "Welcome to Windows Update" web page, click on the "Express" button.
    Windows Update page with the Express button highlighted

  4. Microsoft will scan your computer looking for any updates your computer may be missing.
    Checking for latest updates on your computer

  5. The first time your run Windows Update, Microsoft may ask you to "validate" that you have a legal, licensed version of Window. Just click on the "Continue" button
    Genuine Windows Validation
    You may be taken back to the "Welcome to Windows Update" screen after you go through the validation process. Just click on the "Express" button to continue.

  6. Eventually, you'll see an "Express Results" screen showing you all of the high priority updates you need to install. How do you install these updates? Just click on the "Install Updates" button.
    Express Results screen in Windows Update

  7. Microsoft will download and install the updates
    Installing Updates Screen in Microsoft Windows
    Then, when it is done updating Windows, Microsoft will display a screen telling you that "You have successfully updated your computer." Click on the "Close" button to continue.
    Installing Updates
So, you're done, right? Not exactly. There are two things to keep in mind:
  • A lot of critical updates require you to restart your computer once they have been installed; and
  • Go back to Step 2 and keeping running Windows Update over and over until you finally see the lovely "No high-priority updates for your computer are available" message. YOU ARE NOT DONE UNTIL YOU SEE THAT MESSAGE.
    No high-priority updates for your computer are available message
If you have never run Windows Update before, expect to see more than one critical update... and expect the download to take just a little longer than the gestation period of an Asian elephant. Once you have downloaded all of the Critical Updates, though, you probably won't see more than one new critical update every couple of weeks. [Microsoft releases new critical updates, if necessary, on the second Tuesday of each month.]
The Mac OS has its own version of Windows Update called "Software Update." You can find it at Apple Menu > Control Panels > Software Update (I think). Click on "Update Now" and follow the on-screen prompts. Chances are you'll only see new updates from time to time.
Okay, two down, three to go. The next thing we should do every week is ...

3. Run ScanDisk/DiskFirstAid

ScanDisk is a built-in tool from Microsoft that scans and, in most cases, repairs errors on your hard drive. These errors usually occur when your computer crashes and has to be restarted.
The technical explanation is that
Your files are stored on your hard drive in data groups called "clusters", sometimes these clusters can become "cross linked" with other clusters belonging to other files, or they can simply become "lost" from the rest of its fellow clusters.
When you run scan disk the utility saves the "lost" file fragments into new files that you can view called "check" files (*.chk). It also repairs cross-linked clusters by making a copy and pairing it to two separate families (the original and the cross linked one).
[ http://pchelp.ncms.org/HelpDocs/Scan_Defrag/Scan_Defrag.htm ]
In other words, ScanDisk makes your computer a little happier and a heck of a lot more stable.
To run ScanDisk in Windows 95/98/ME, just go to Start > Programs > Accessories > System Tools > ScanDisk. If you have Norton Utilities or Norton System Works, use Norton Disk Doctor instead of Microsoft's ScanDisk. Disk Doctor is a little more thorough.
Windows XP doesn't come with a ScanDisk utility per se. Instead, XP uses a revamped version of the classic DOS utility "CheckDisk." To run CheckDisk, go to Start > Run and type chkdsk
For Mac users, Apple offers something called DiskFirstAid. To run DiskFirstAid on your Mac, double-click on the DiskFirstAid icon in your utilities folder. And, like the PC, if you have Norton Utilities on your Mac, use Norton Disk Doctor instead of Apple's DiskFirstAid. Disk Doctor is a little more thorough.
The next stop on our weekly hit parade is ...

4. Run Defrag

ScanDisk stabilizes your computer. A disk defragmenter ensures that, if a particular sector on your hard drive fails, you only lose a few files instead of a lot. According to our friends at WhatIs.com (the best technical glossary on the Net, and one of my top 21 Web resources),
When a file is too large to store in a single location on a hard disk, it is stored on the disk in discontiguous (not adjacent) parts or fragments. This fragmentation is "invisible" to the user; however. The locations of the fragments are kept track of by the system. Over time, disk access time can be slowed by fragmentation since each fragmented file is likely to require multiple drive head repositionings and accesses. (There's nothing you can do to prevent fragmentation, by the way.)
A disk defragmenter is a utility that rearranges your fragmented files and the free space on your computer so that files are stored in contiguous units and free space is consolidated in one contiguous block. This also improves access time to files that are now contiguous.
To run Window's built-in Disk Defragmenter program, go to Start > Programs > Accessories > System Tools > Disk Defragmenter. If you have Norton Utilities or Norton System Works, use Norton Speed Disk instead of Microsoft's Disk Defragmenter. Speed Disk is a HECK OF A LOT more thorough.
The last time I checked, Mac's didn't come with a built-in disk defragmenter. Don't pout, though—Norton Speed Disk (in Norton Utilities ) works wonderfully on a Mac, and I seem to remember that Alsoft makes a pretty good Mac defrag program called "DiskWarrior."
So, we've updated our virus definitions, downloaded and installed the latest critical updates, made our computers more stable by running ScanDisk or Disk Doctor, and made our computers a little faster by running a disk defragmenter. The last thing we need to do every week is ...

5. Backup Your Data

Here is a frightening thought: imagine what would happen if your computer just up and stopped working. All of your programs, all of your emails, all of the pictures and files you have downloaded from the Net ... gone. How would you react? Heck, how would you SURVIVE?
In the world of computing, you either have a disaster recovery plan or you don't. Fortunately, backing up your critical data is no harder than downloading new virus definitions or running a disk defragmenter.
Well, maybe it is a *LITTLE* harder.
Fortunately, if you have a PC, Fred Langa has written a *WONDERFUL*, 12 step article titled "Fast, Easy Backups For Win98 / ME / NT / 2K / XP" at
http://www.langa.com/backups/backups.htm.
This article tells you everything you could possibly want to know about how (and why) to back up a PC. Read it. Live it. Love it.
Microsoft also has their own "Backup Basics" article at
http://www.microsoft.com/athome/security/update/backup.mspx
that is both in-depth and easy-to-read. And for information on how to backup a Mac, check out
http://www.drmac.net/framesets/resourceframeset.html .
So, that's it. Update your virus definitions, run Windows Update (or the Mac equivalent), run ScanDisk, run a disk defragmenter, and backup your data. Do these five things in order ... each and every week ... and both you and your computer will be a heck of a lot happier.

How to Unzip a File

http://www.winarchiver.com/tutorials/images/unzip-file.jpg
Have you ever had a file on your computer that was so ridiculously large it was all but impossible for you to send it to a friend as an email attachment? Or, even better, have you ever wanted to email someone a BUNCH of different files at the same time but didn't want to go through the tedious process of having to attach the files to the email one at a time? That's where the ZIP file format comes in.
 
The ZIP file format allows you to both compress and archive your files. What does that mean in English? Well, 'file compression' is just a way of saying 'smushing a file so that it takes up less space on your hard drive' and 'file archiving' is just a way of saying 'making a copy of the original file so that you can put a copy somewhere else.' The file compression part of the ZIP file format is what makes it so popular with web developers. For example, in the PowerPoint Files section of my website I've placed about two dozen PowerPoint files you are free to download. Each of those files are "zipped" so that they take up less hard drive space and therefore will take less time for you to download.
 
How do you open [or "unzip"] a ZIP file? If you have Windows ME or XP, or Apple OS X, just double-click on the zip file or folder, which will look something like this: ZIP Folder in Windows XP
Notice the zipper? That's Windows XP's way of telling you that the file or folder has been zipped. Once you double-click on that file or folder, it should open just as if it were a regular file or folder on your computer. 

What if you don't have Windows ME or XP or Apple OS-X? Well you need to download and install a special piece of software that will zip and unzip files. This may sound like more trouble than it is worth, but a zip/unzip program is an ESSENTIAL tool, especially if you are going to be using the Internet a lot. In fact, call someone you know who is a computer guru, someone whose advice you trust implicitly, and ask her if she could live without her zip program. She'll laugh. Zip programs are THAT importan
 Where can you get a zip program? Well, for PC users, I recommend WinZip. You can download a free evaluation version of WinZip at http://www.winzip.com/ddchomea.htm. It has been a while since I have unzipped a file on a Mac, but I seem to remember that Aladdin's free StuffIt Expander worked pretty well. You can download StuffIt expander for Mac, PC, and even Linux at http://www.stuffit.com/
Download either program and then install it. After that, whenever you encounter a zipped file (a file that ends in ".zip"), just double-click on that file. Your unzip program will automatically open, and you can then choose where you want the unzipped version of that file to be saved on your computer.
That's it. 

By the way, one of the reason why I prefer WinZip over StuffIt Expander for the PC is that WinZip adds unzip capabilities to Windows Explorer's context menus. To see what that means, install WinZip, right-click on any zipped file on your computer, and then choose "extract" from the pop-up window. No more double-clicking. Happy uncompressing!

Wednesday, March 26, 2014

How To Use the File History Feature in Windows 8 to Restore Files


Do you understand the depth of adversity that PC data loss can cause? If statistics are to be believed then in the US more than 31% of PC users have lost their files under disaster events beyond their control. Highly risky situations like Windows or hardware crash can happen any time and before you would realize the issue, all your important data and files will be lost forever. According to records, in the United States every week 140,000 hard drives crash, which sounds highly alarming. So it is important to have proper backup arrangement for the files saved in your PC.
What is File History?
Microsoft has introduced a new backup service called File History in Windows 8 that would create safety copies of your important personal files to prepare a backup. This will keep you always prepared for the worst. File History is said to be more advanced than Windows Backup feature that was built into Windows 7. The process happens automatically and the backup files get saved on any network drive or external hard disk. By default the feature remains off, and has to be turned-on.
While the Windows Backup process in Windows 7 was limited to make copies of files only on a daily, weekly or monthly basis, the Windows 8 File History has much advanced features. By default, it makes continuous and automatic backups of the files after every hour. However, if you want your File History to make more frequent restores then you can easily change the default time interval through advance setting. Also, at any point of time if you want to manually run the service, then you can easily do that as well. File store appears in the task manager as fhsvc.
So, File History is an advance and useful feature in Windows 8 that allows you to restore your lost or corrupted files. Hence, you must turn on the File History in your system to avoid loss of data under risky situation like Windows or hard drive crash and others.
It is very easy to use this service and you must use it. Once you turn it on and perform the needful setting steps you can forget all about it. It will of its own perform its job of securing your important files continuously.
Read below to master the tips on how to configure File History on Windows 8 and how to restore files even after a disastrous loss of files.
How to Configure File History on Windows 8?
  • To turn on the File history feature in your Windows, first go to the search of the start screen and type File History. In the search results, under "Settings" you will get the File history panel. If you are not comfortable working with the start screen, then you can directly go to the Control Panel, and there in the ‘System and Security' section you will find the folder for File History.
  • Once you open the folder, it will automatically detect an external drive connected to your PC. However, if you want to save the backup files in some other location like the network drive, then you can manually chose the destination by clicking the "Select Drive" link that appears on the left side.
  • After choosing the destination, click on "Turn On" button located at the right side of the Windows to activate the File History.
  • Once you are done with this setting, File History will continue maintaining the backup for all your files like documents, music, photos and videos.
How to Restore Files Using File History on Windows 8?
At any time if you want to restore the old files, which have been saved as backup files, you need to perform the following steps:
  • Go to Control Panel > System and Security > File History
  • Open the File History in Control Panel and look for the ‘Restore personal files' link towards left side.
  • This will open up the folders of the recently saved files. If you want to look for the folders of earlier date you can move to those folders by clicking on the back and forward navigation buttons located at the base of the window with a blue colored Refresh button at the center.
  • After deciding the file you want to restore, right-click on it. Here you will get two options "Restore" and "Restore to." If you click on "Restore" then the backup file will get restored at the current location of that file and it will completely replace the current file. But if you click on "Restore to" then you will be allowed to choose a new location for the restored files. Thus both the files (current and restored one) will be intact.
File History works with files stored in Libraries, Contacts, Desktop, and Favorites folders in your system. It can make backup copies of all types of files such as documents, music, videos, music, etc. Its only limitation is that it can't backup those files or folders that you have synced with cloud storage services.